Introduction
The Building Blocks module forms the foundation of your Expian configuration.
It defines the essential structural components that all products, services, and journeys rely on, including Terms & Amendment Fees, Locations, Venues, Capacities, Ticket Types, and Custom Fields.
By setting up these building blocks correctly, organisations ensure that every sale, report, and integration is underpinned by a consistent and logical data framework.
This is where the system learns what you sell, where you sell it, and how capacity, pricing, and access are managed across both Attractions and Travel environments.
Why It Matters
The Building Blocks area is the backbone of your entire Expian setup.
It ensures:
- Operational accuracy: products and services behave as expected across sales channels.
- Data consistency: all configurations use the same references for reporting and finance.
- Scalable growth: new locations, venues, and ticket types can be added without rework.
- Customer trust: bookings, refunds, and terms are handled transparently and consistently.
- Integration reliability: standard IDs, capacity definitions, and field mappings ensure smooth connection with finance, CRM, and ticketing systems.
Without solid building blocks, downstream configurations like Products, Entitlements, and Reporting may become unreliable or inconsistent.
Configuration / How to Use
To sell tickets, we need to define ticket types. However, when selling tickets for entry to physical venues (often referred to as spaces), we must also understand the capacity or size of those venues. These venues may exist within one or multiple locations.
All sales require clearly defined terms and conditions, including cancellation and amendment fees, so that the system knows how to handle any changes or refunds.
Capacity can be grouped, as a single venue may have multiple capacity configurations. For example, a ferry route may include several vessels, each with different capacities. Similarly, a function room could be arranged for a dance event or a seated dinner, each setup requiring a different capacity within the same venue (space).
Locationsand venues can often mirror one another, but some setups require multiple venue configurations. For example, visitors might book to see the Palace Gardens only, or the Palace and Gardens combined.
Therefore, will describe how to work through the Building Block functionality in the following order:
- Terms & Amendment Fees
- Locations
- Capacity
- Venues
- Custom Fields
- Ticket Types
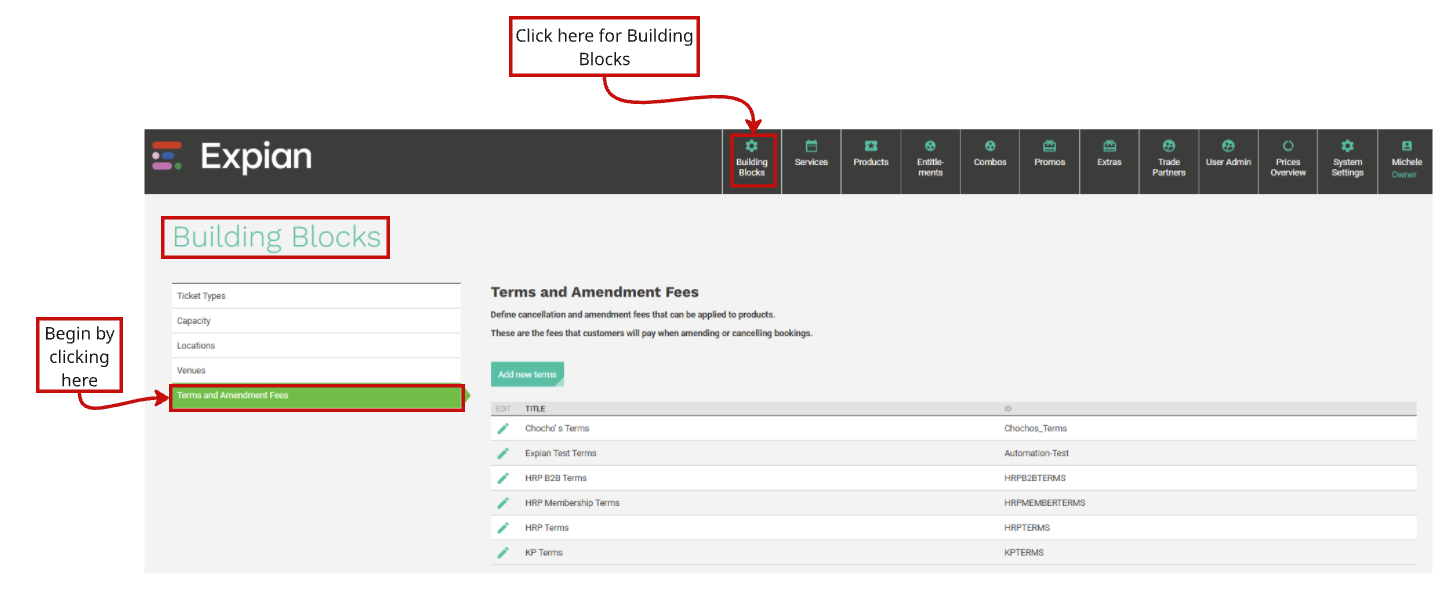
Terms and Amendment Fees
The Terms and Amendment Fees section defines how cancellations, booking amendments, and customer-facing terms are managed within the system. It combines both the text of your Terms and Conditions, used in customer confirmation emails, and the financial rules applied when bookings are cancelled or amended.
Flexible fee rules can be configured based on ticket quantities, timing (for example, offering a 50% refund up to 31 days before the visit), or a percentage of the total booking value. Multiple rules can be layered to manage different conditions, such as group bookings or specific event policies.
Each fee can also be linked to relevant Sales Channels (e.g., Web, Reservations, or Trade Partner) and associated with Cost Centre and Account Codes to ensure correct financial reporting.
When products are created, the Terms and Amendment Fees can be linked together and attached to confirmation emails. Expian automatically prefixes a link to the Terms and Conditions in each confirmation to ensure customers always receive the most up-to-date version.
Create Terms
Select Terms & Amendment Fees as shown on the image above and select 'Add new terms’
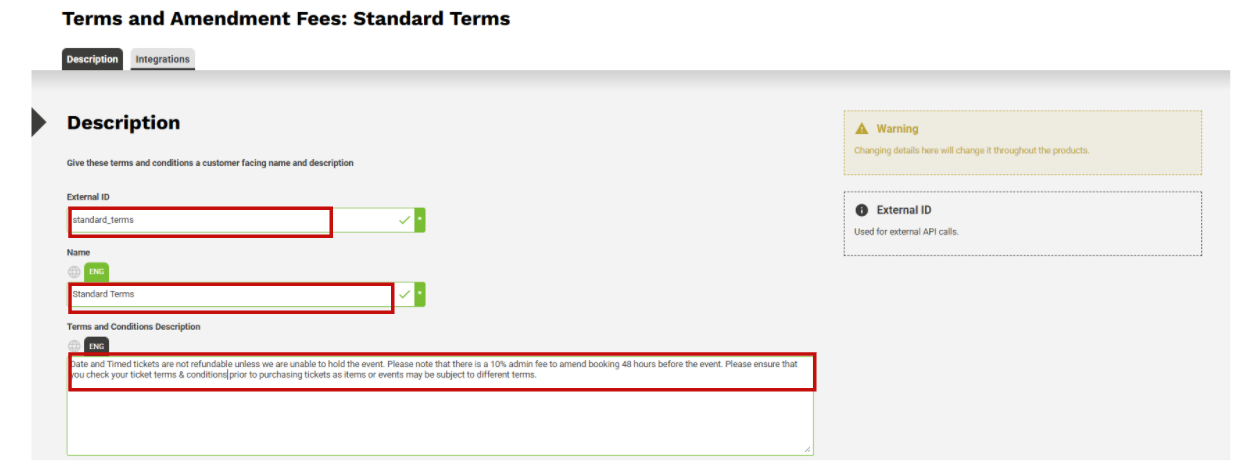
- External ID: required system reference /identifier for external integrations, APIs, and reporting. It should be clear and descriptive so it can be easily recognised when mapped across systems.
- Name: enter a friendly Term Name
- Terms and conditions Description: define the contractual information that appears in customer confirmation emails. They ensure that every booking communicates clear and consistent sales policies to customers. You can create multiple Terms and Conditions records and link them to specific products, markets, or brands as required. This flexibility allows you to manage different sales policies per brand, market, or business area, especially useful when operating multiple booking sites or regional variations. The system automatically includes the latest version of the linked Terms and Conditions in confirmation emails, ensuring customers always receive the correct and most up-to-date version.
Cancellation and Amendment Fees Overview
Cancellation and Amendment Fees define the rules and charges applied when a booking is cancelled or changed. They allow organisations to balance fairness to the customer with recovery of operational costs, helping ensure consistent and transparent refund policies across all sales channels.
Multiple rules can be created to reflect different scenarios, for example, varying charges depending on when the booking is changed or what type of amendment is made.
Fees can be set as a fixed amount or a percentage of the booking value, with the flexibility to create multiple rules within a single policy. Each rule defines when and how a charge is applied, for example, 50% if cancelled more than 31 days in advance, or 100% within 30 days of the visit.
Rules can also be linked to specific sales channels and associated account or cost codes, ensuring accurate reporting and financial reconciliation, configured in the Integrations tab. A Cost Centre (code) represents the business area, department, or location responsible for the transaction. It allows income and expenses to be tracked at a more detailed operational level, for instance, by venue, brand, or market. Using both together, ensures that financial data from Expian aligns precisely with your organisation’s accounting structure. Together, they provide clear visibility of where revenue or fees originate and which department or market they belong to, supporting accurate reconciliation, auditing, and performance reporting across all business areas.
Cancellation Fees
Further down this same page, click on 'add a new record'

- Channels: are the various platforms through which sales or bookings are made. Defining and linking the correct sales channels ensures that bookings, pricing, and fees are applied accurately across every customer touchpoint. It allows each channel to follow the right rules for availability, pricing, and commissions while maintaining consistent reporting and financial reconciliation across all sales. These are the predefined in Expian:
- POS(Point of Sale): used for in-person transactions made by staff at ticket desks, or retail counters. It provides a simplified interface optimised for fast customer service, on-site payments, and issuing printed or digital tickets.
- Web(B2C): online customer bookings made through the client’s public-facing website
- Reservations (back-office): supports manual bookings made by internal teams, often via phone or email.
- It allows staff to reserve, modify, or cancel bookings on behalf of customers, applying discounts or adjustments as needed.
- API: connects Expian to third-party systems and applications. It allows automated bookings, amendments, and cancellations to flow between Expian and external platforms, such as partner booking engines.
- TradePartner (B2B): handles bookings from external partners such as tour operators, resellers, or travel agents. It supports negotiated pricing, commission structures, and allocation controls to manage partner-specific sales.
- App: refers to bookings made through the client’s dedicated mobile application. It provides customers with a streamlined, on-the-go booking experience that mirrors the functionality of the web channel while supporting mobile-specific features such as stored tickets, notifications, or loyalty integrations
- Self-Service kiosks (SSM): used for on-site automated sales through physical kiosks. These machines allow customers to make purchases, collect pre-booked tickets, or amend bookings without staff assistance.
Select the sales channels the cancellation fees are applicable to.
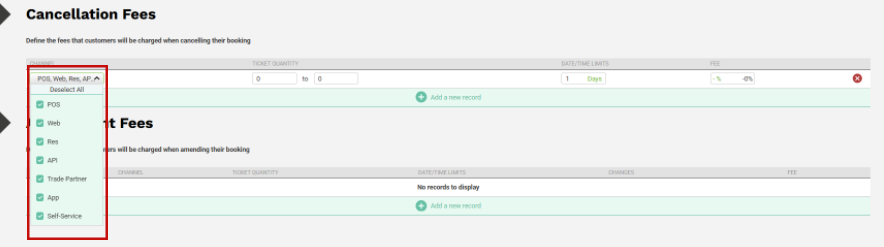
- Ticket Quantity: this applies to, for example 0 to 250
- Date / Time limits: number of days before the booking date that determines when the rule is valid, for example 6 months

- Fee: enter the cancellation fee, for example reduce by percent at -100%, therefore, they will not receive a refund. The full list of Fee Options are:
- Fixed amount: a set charge (e.g., £10 per booking).
- Percentage of booking value: fee calculated from the total order value.
- Percentage of value reduction: fee applies only if the amendment lowers the booking value.

Amendment Fees
Below Cancellation Fees are Amendment fees.
- Select 'Add a new record'

The Rule Number (#) is automatically assigned to maintain order and make it easy to identify each condition within the policy.

- Channels: See Cancellation Fees for definitions
- Ticket Quantity: this applies to, for example 0 to 250
- Date / Time limits: number of days before the booking date that determines when the rule is valid, for example6 months
- Changes: set the type of change for the Amendment Fee Rule. In the drop down the options are:
Product Changed
Time Changed
Location Changed
Ticket Removed
Tickets Added
Addons Removed
Addons Added
- Fee: enter the amendment fee, for example reduce by percent at -100%, therefore, they will not receive a refund. The full list of Fee Options are:
- Fixed amount: a set charge (e.g., £10 per booking).
- Percentage of booking value: fee calculated from the total order value.
- Percentage of value reduction: fee applies only if the amendment lowers the booking value.
- Applies when value is reduced: applies to amendments only per rule.
- Order: drag records up and down to display them in the desired order.

Conditional Logic
You can configure separate rules for different booking conditions:
- By group size, e.g., different policies for individuals vs. groups.
- By amendment type, e.g., date changes allowed without charge, but location changes incur a fee.
- By booking value reduction, apply a fee only when an amendment reduces the total order value.
This flexibility allows each product or market to maintain tailored refund and change policies.
Integrations
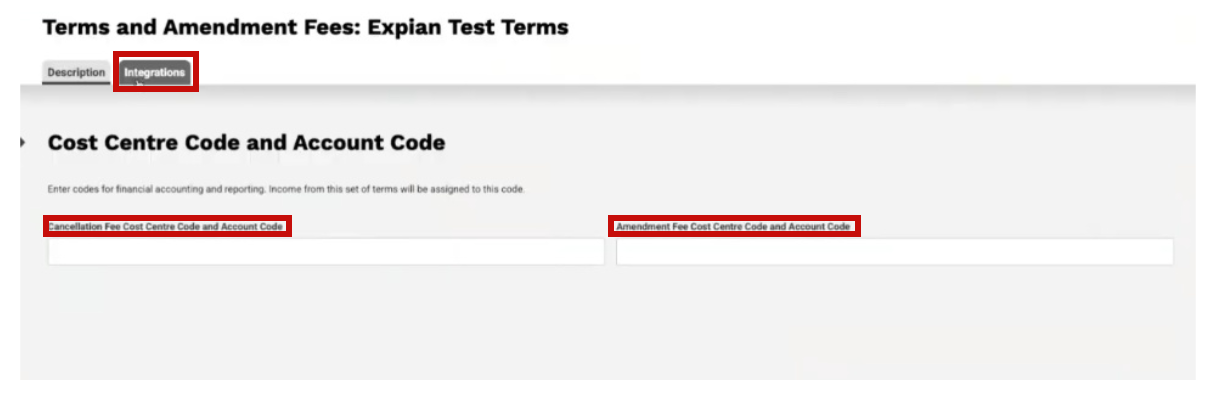
As mentioned in the cancellation and amendment fees introduction, if you are applying amendment or cancellation fees and have an integration with your financial system with Expian, you can add a Cost Centre Code and Account Code for each. Any income generated from these fees under this set of terms will then be automatically assigned to the specified codes.
Click on the tab next to Description labelled 'Integrations' and add your codes as required and click on Save.
Best Practice
- Keep policy names clear and descriptive to make them easy to identify and link to products.
- Test fee rules using dummy bookings before applying them to live sales to confirm they behave as expected.
- Review rules regularly to ensure compliance with local refund regulations and consumer rights.
- Document any exceptions (for example, weather closures or charity events) within operational notes for transparency.
- Create multiple cancellation policies when needed, for instance, by sales channel, ticket quantity, or time before the event (hours, days, weeks, months, or years).
- Ensure your Terms and Conditions clearly explain these rules in customer-friendly language to avoid ambiguity or disputes.
Summary
The Cancellation and Amendment Fees setup provides a flexible framework for managing refunds and booking changes consistently across all products.
Once created, these policies can be linked directly to products through the Product → Pricing tab, ensuring that the correct rules are automatically applied whenever a booking is cancelled or amended.
Locations
Locations define the physical or operational places where products, services, or journeys occur. They act as the anchor point that connects Venues, Routes, and Services, allowing the system to manage capacities, transfers, and reporting accurately across multiple sites.
As mentioned earlier, Locations often mirror Venues (spaces), but some setups may require multiple venue configurations under a single location. For example, visitors might book to see the Palace Gardens only, or the Palace and Gardens combined.
Locations can also represent stations, piers, or route stops, making them essential for both Attraction and Travel/Ferry operations.
Create Locations
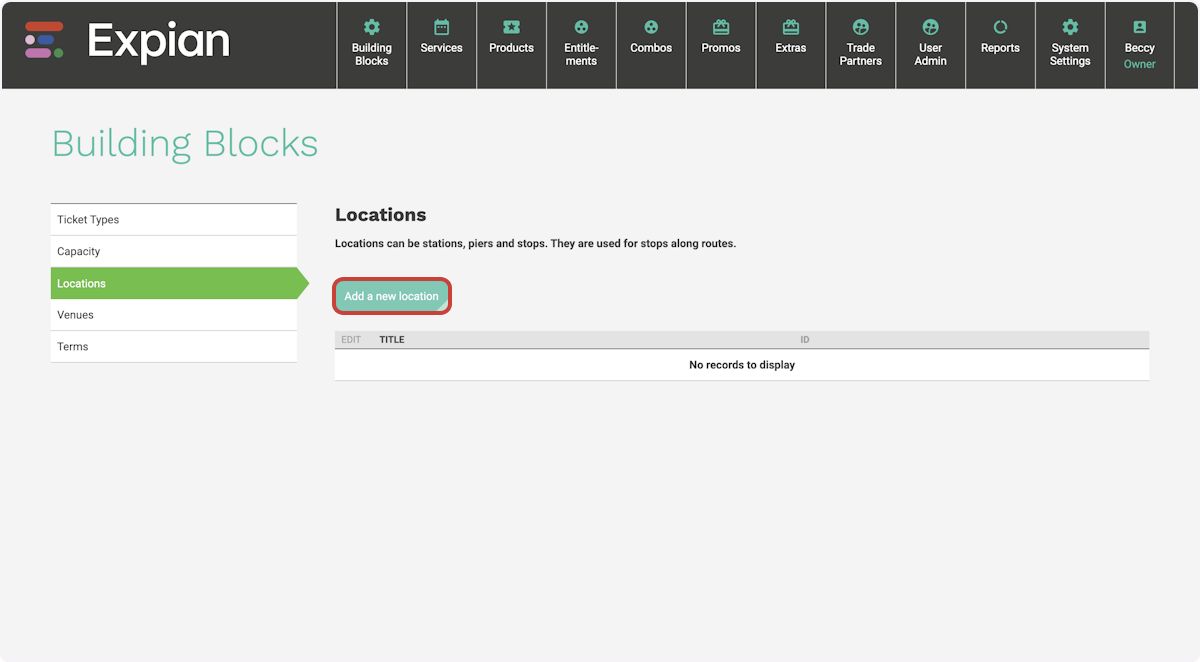
- Select Locations on the left and click Add a New Location
Description Tab
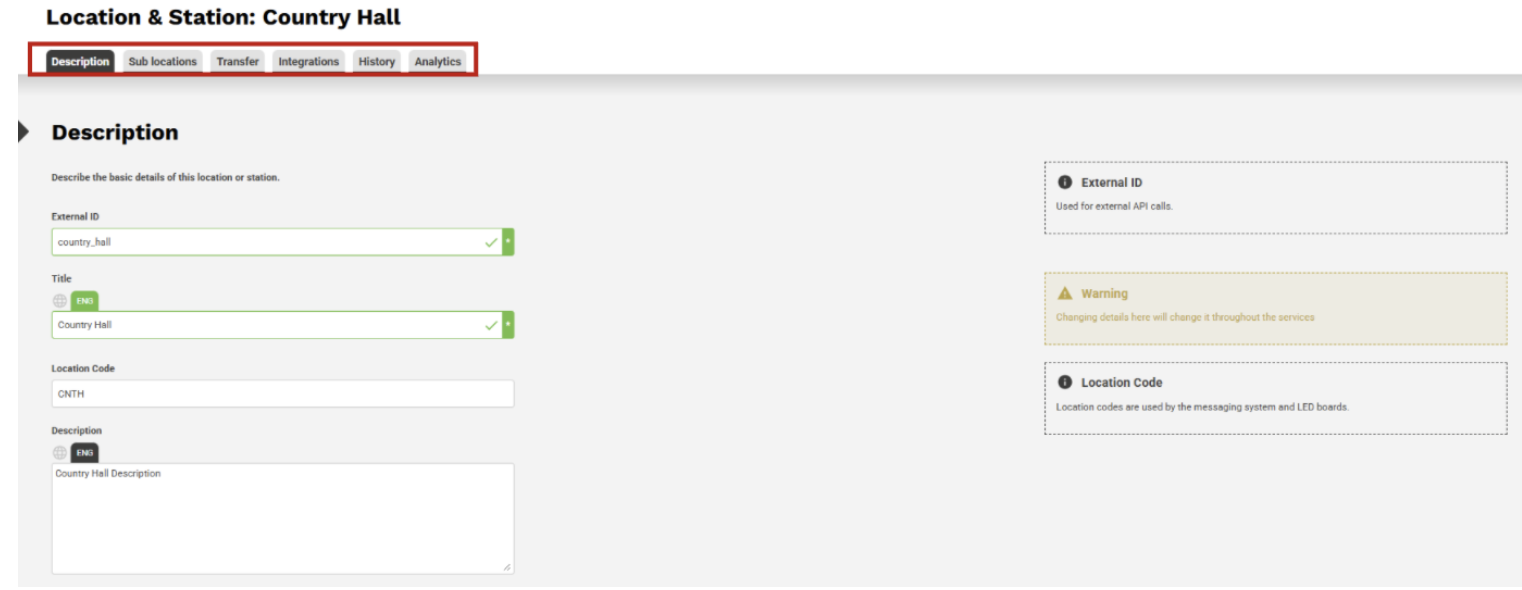
The Description Tab defines the key identifying and geographic details of a location.This information ensures that every venue, route, and service is correctly linked to a physical or operational place, supporting accurate reporting, navigation, and customer communication.
- External ID: required system reference /identifier for external integrations, APIs, and reporting. It should be clear and descriptive so it can be easily recognised when mapped across systems.
- Title: the display name of the location as it should appear in the system and customer-facing interfaces
- Location Code: a short internal reference or shorthand identifier used for quick lookup or integration mapping
- Description: optional text field for internal notes or a short description of the location. Useful for identifying site type, size, or special operational notes.
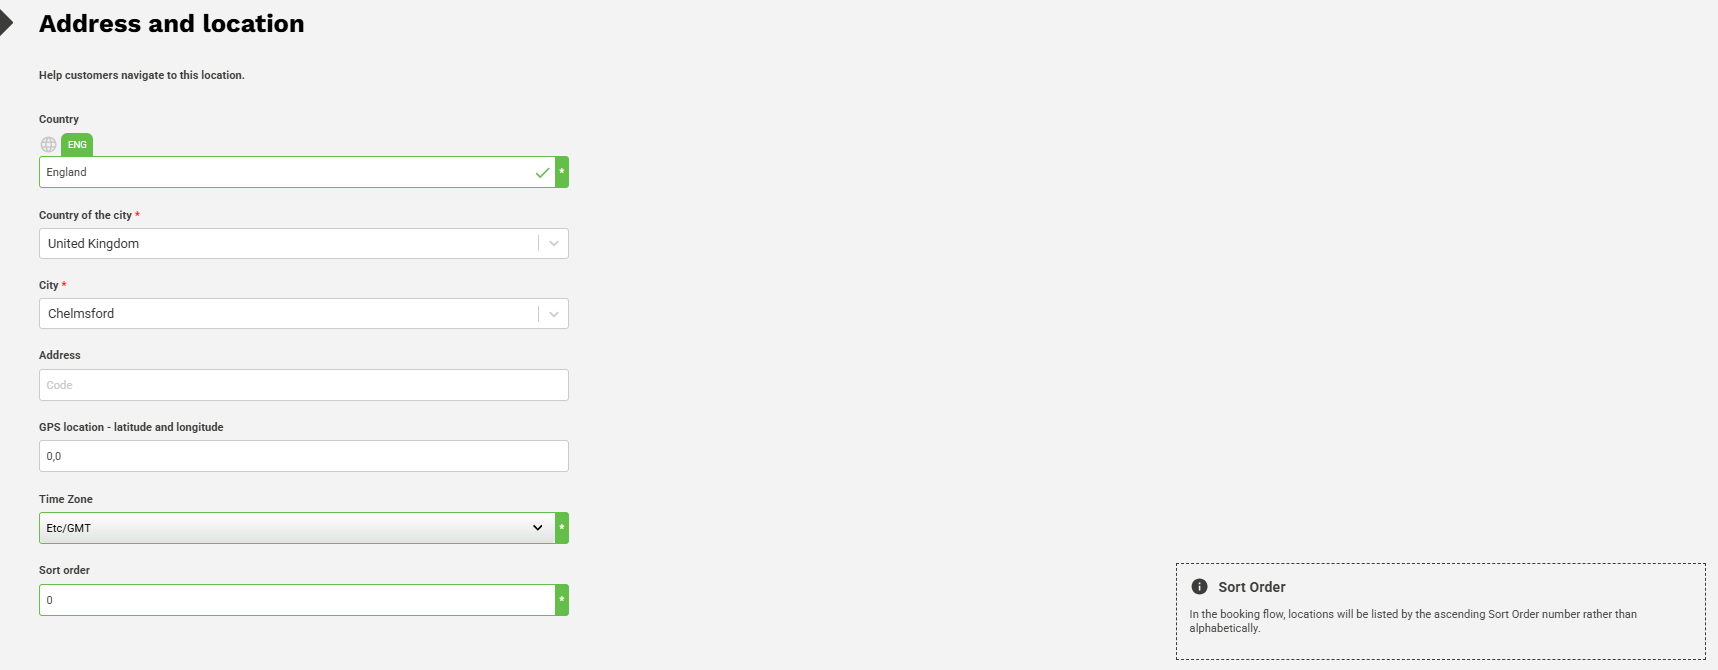
- Country: select the country where the location is based. This supports region-specific reporting and time zone accuracy.
- Country of the city: used to link sub-regional locations or cities within multi-country configurations (for example, when a route connects cities in different countries).
- City:the city or locality associated with the location. Helps define routing, address formatting, and regional reporting.
- Address: full address of the location, used for operational visibility and, where applicable, customer-facing confirmations or maps.
- GPS location - latitude and longitude: optional field for precise geolocation data. Recommended for travel and route-based products to support accurate navigation and transfer details.
- Time Zone: defines the local time zone for the location. Ensures schedules, services, and capacity plans align correctly across different regions.
- Sort Order: determines where this location appears within lists or booking journeys. Lower numbers appear first. Useful when ordering multiple locations along a route or within a complex multi-venue site.
Consistency in External IDs, Location Codes, and Time Zones is essential for accurate reporting and integration. Using standard naming conventions across locations ensures smooth API communication, prevents duplication, and helps data map correctly between Expian and external systems such as finance, CRM, and ticketing gateways.
For organisations operating across multiple countries or routes, aligning time zones also ensures that timetables, event schedules, and transfer connections display accurately for both staff and customers.
Sub-Locations
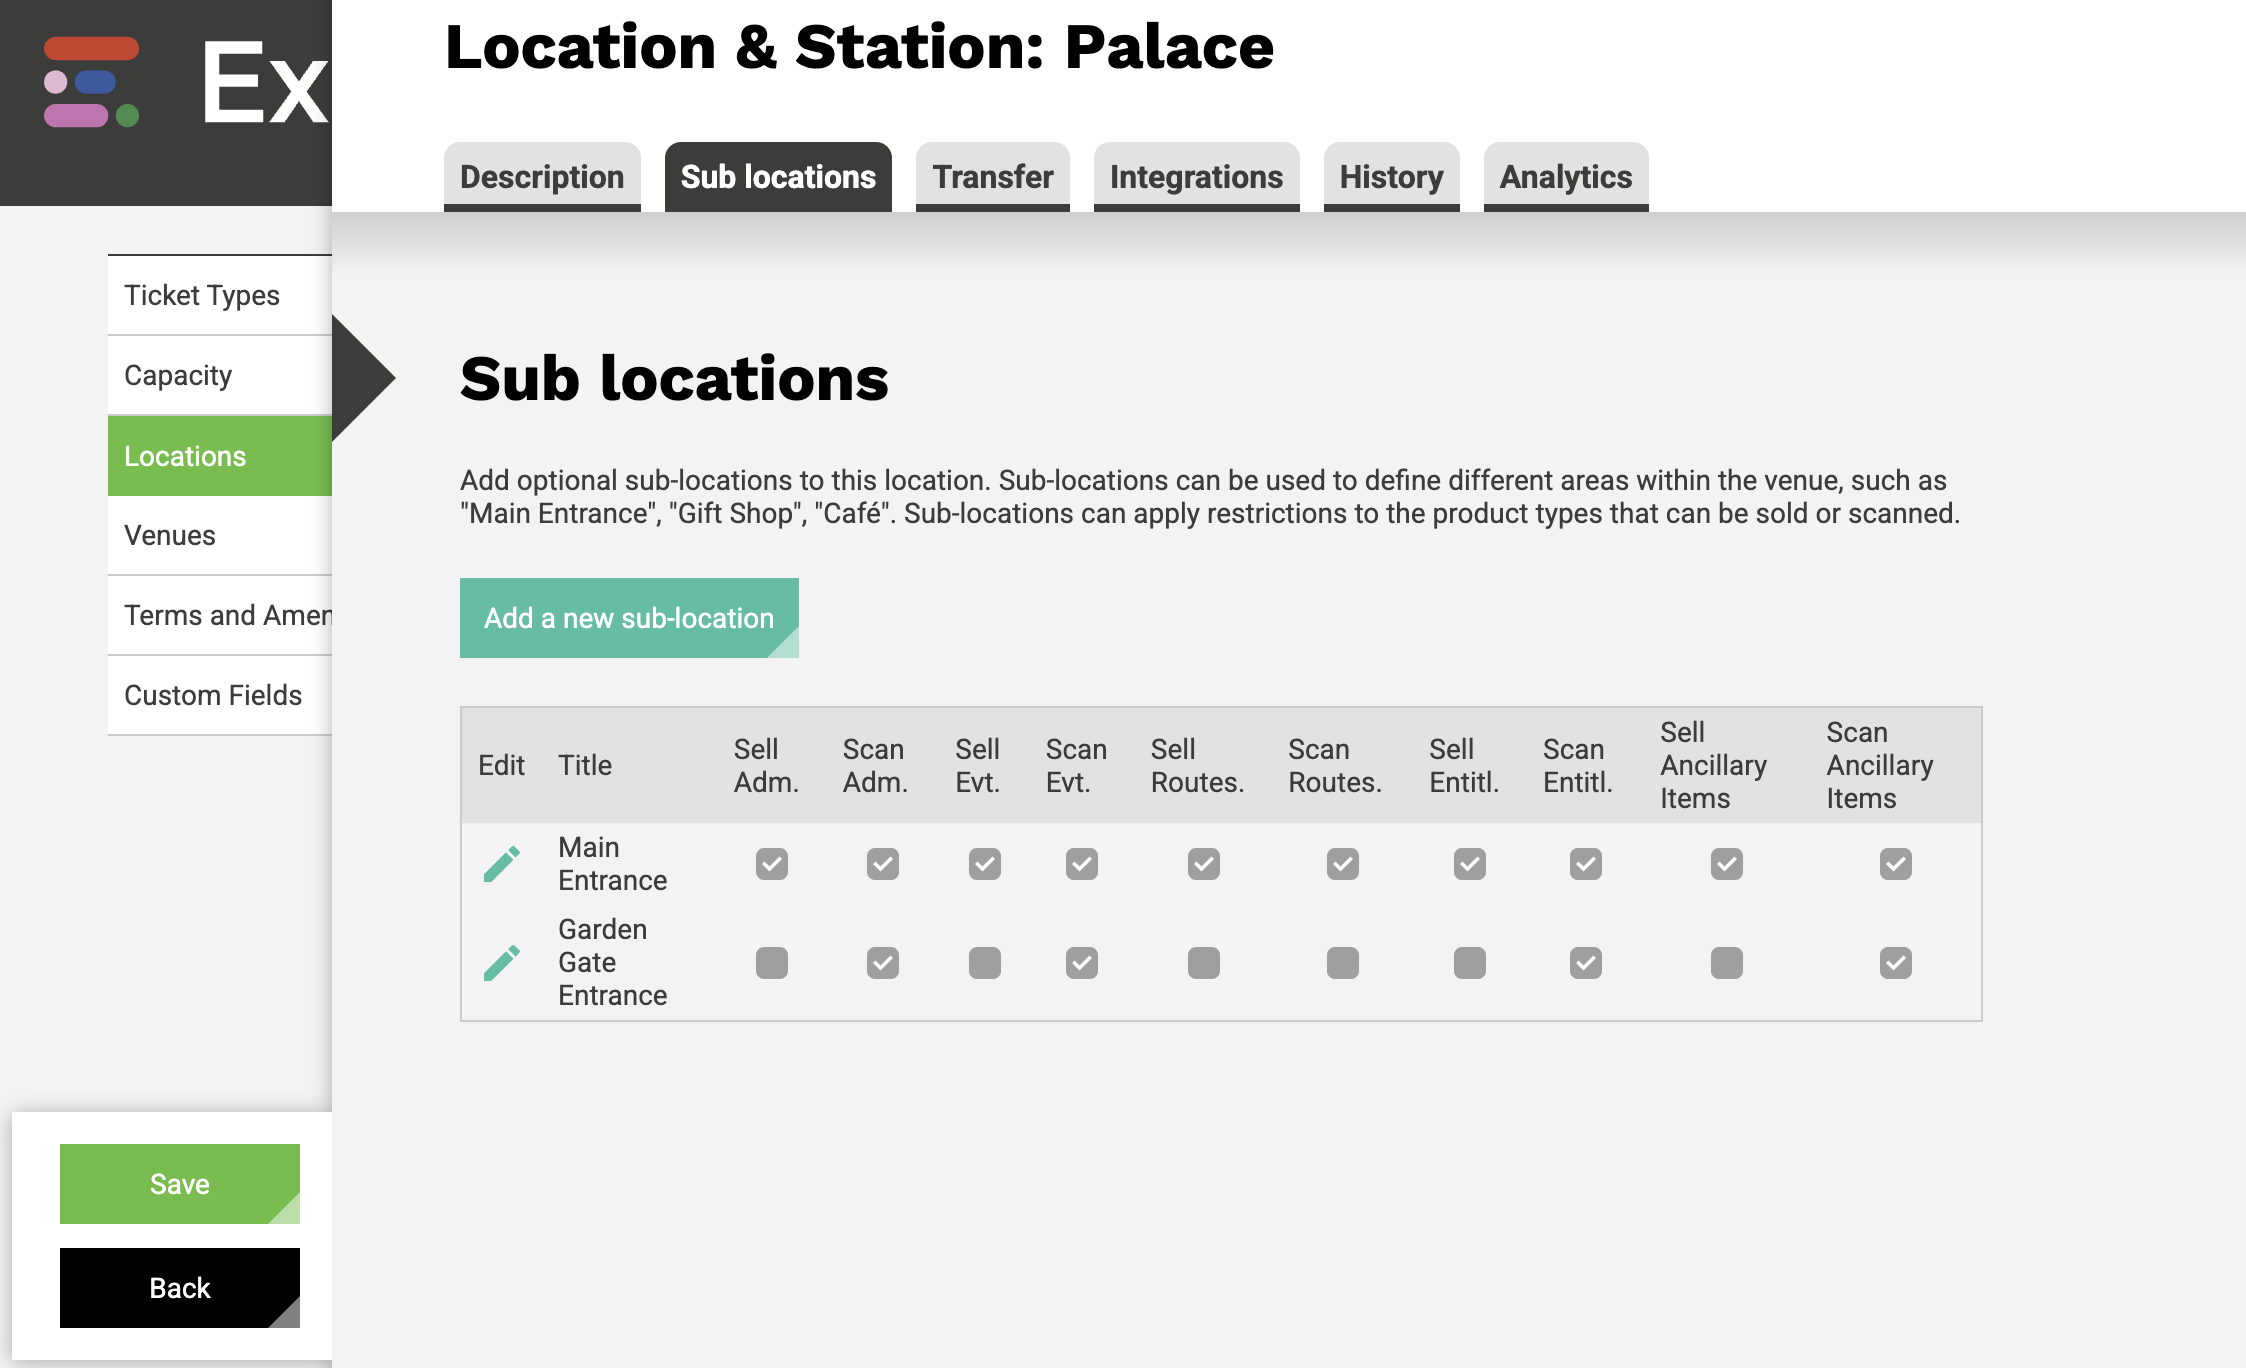
Sub-locations provide greater control and flexibility across your venues by allowing you to define specific areas within a location, such as a Main Entrance, Gift Shop, or Café.
Each sub-location can have tailored permissions that determine which ticket or product types can be sold or scanned in that area.
This is particularly useful for managing access control, staff permissions, and sales restrictions across zones.
For example, Garden Gate Entrance scanners might be configured to validate admission tickets but not process new sales.
Create Sub-Locations
When setting up sub-locations, you’ll be prompted to define which ticket types, such as Admission, Event, Route, Entitlement, or Add-on, can be sold or scanned within each area.
Note: Enabling sub-locations provides greater control for POS applications and helps maintain accurate sales and scanning permissions across complex venues.
- Click on Add new sub-location
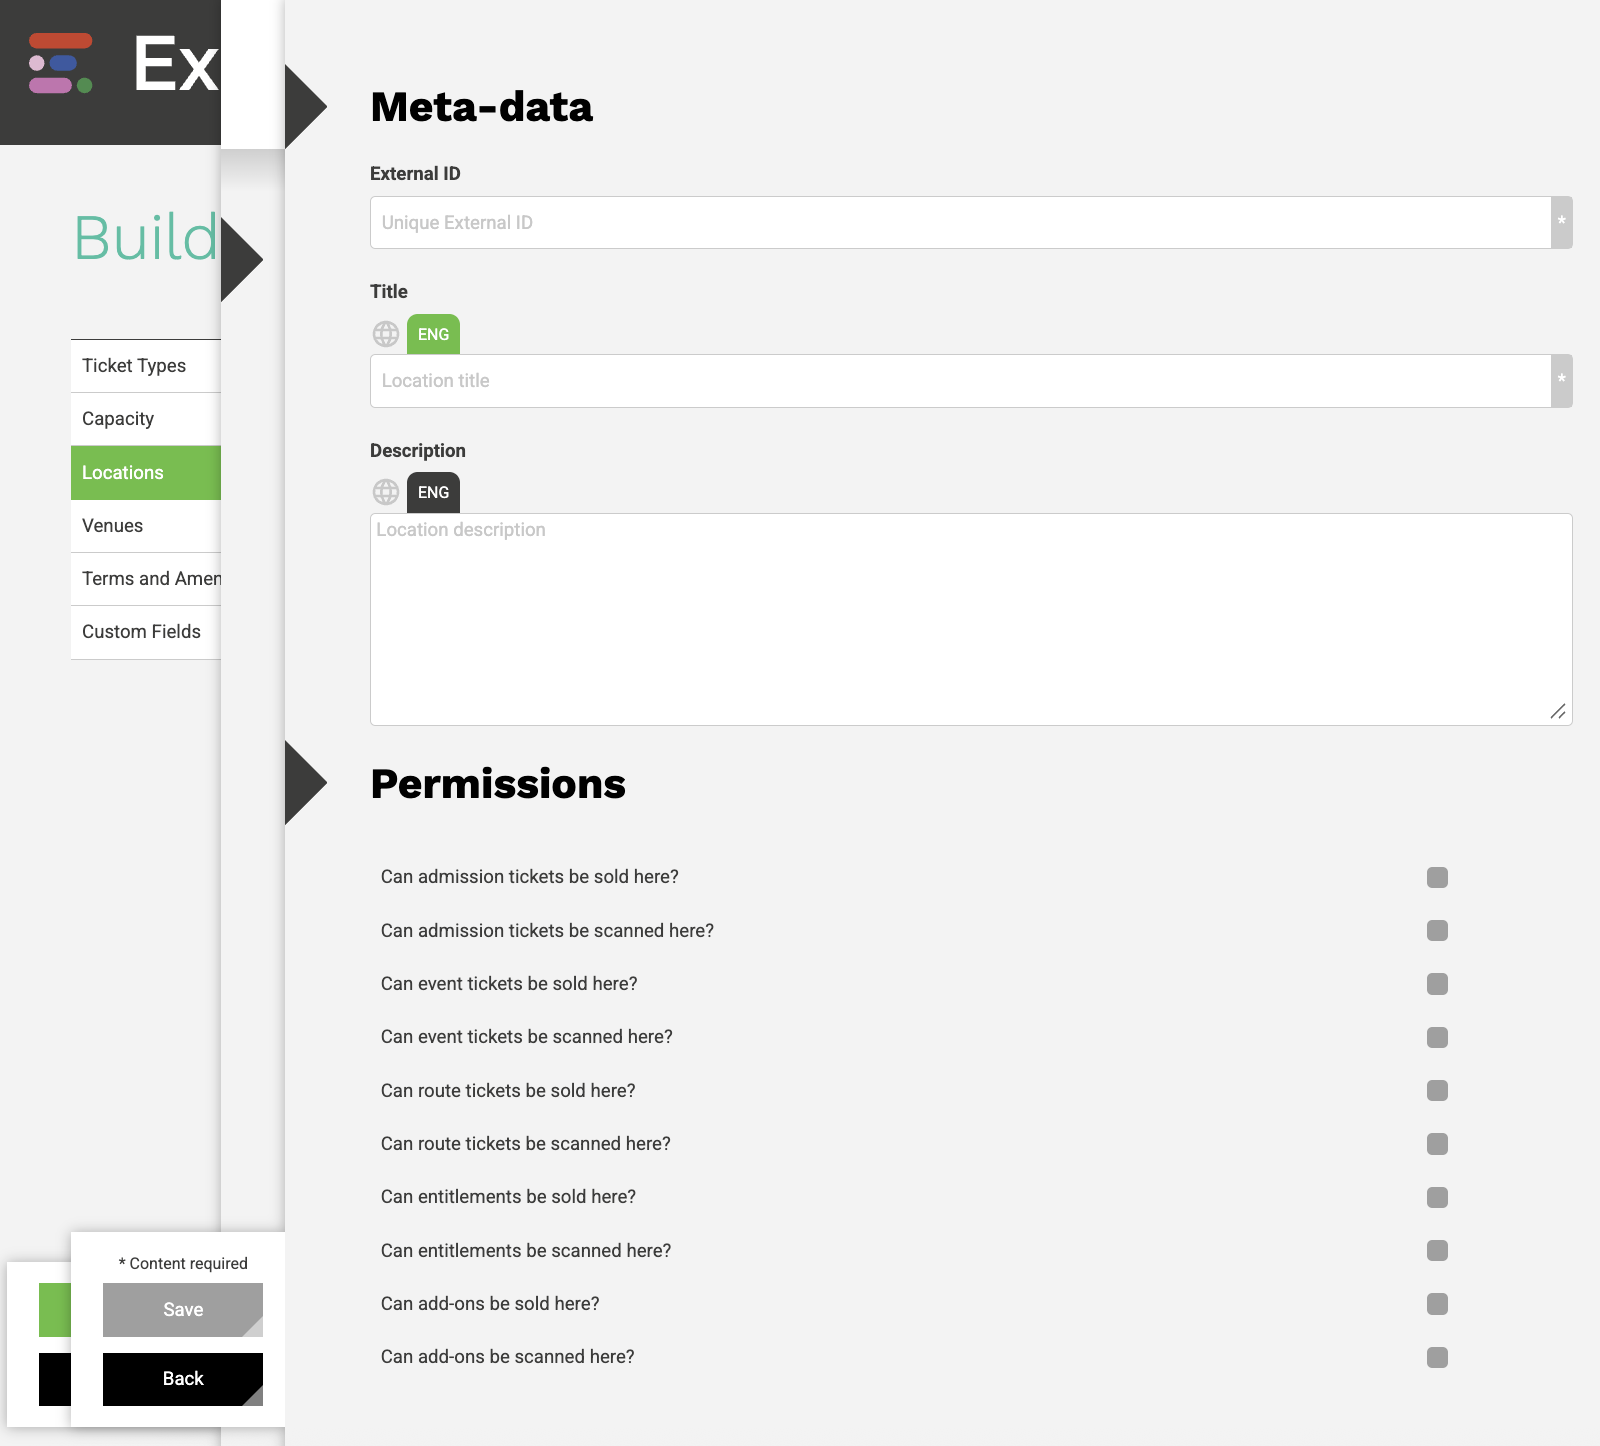
- External ID: required system reference /identifier for external integrations, APIs, and reporting. It should be clear and descriptive so it can be easily recognised when mapped across systems.
- Title: the display name of the sub-location as it appears in the system, reports, and any customer-facing interfaces.
- Description: optional text field for internal notes or a short description of the sub-location. Useful for identifying the site type, size, or any special operational or access notes.
- Sub-Locations and Permissions: these options determine which types of tickets or products can be sold or scanned at this sub-location:
- Can admission tickets be sold here?
- Can admission tickets be scanned here?
- Can event tickets be sold here?
- Can event tickets be scanned here?
- Can route tickets be sold here?
- Can route tickets be scanned here?
- Can entitlements be sold here?
- Can entitlements be scanned here?
- Can add-ons be sold here?
- Can add-ons be scanned here?
TransfersTab
Transfers improve the customer experience by allowing them to move seamlessly between routes, attractions, or transport modes as part of a multi-leg journey.
They reduce confusion, prevent missed connections, and ensure accurate timing, capacity planning, and reporting for multi-leg routes or linked attractions.
They ensure that the system understands how long customers need to travel between locations, which:
- Prevents booking overlaps or impossible itineraries,
- Supports accurate capacity and timing control, and
- Enhances customer communication with clear onward travel instructions.
They are configured within the Location setup to define points where travellers can transfer, for example, exiting one attraction to catch a connecting bus, ferry, or train.
Enabling internal transfers at a location allows it to function as a station or stopover between connected routes or venues.
You can specify a minimum transfer time between legs to ensure there is sufficient time for check-in, passport control, or other operational requirements.
For each transfer, you can also add journey details, such as estimated travel time and specific instructions (for example, which exit, stop, or gate to use).
This functionality is highly flexible and applies to both the travel and attractions sectors:
Ferries and Transport:
- Transfers represent stations, ports, or terminals where passengers disembark and continue their journey on anotherroute or mode of transport.
- Example: a traveller arriving at a ferry terminal and transferring to a connecting ferry or train.
Attractions and Heritage Sites:
- Transfers can represent linked sites within the same organisation.
- Example: a visitor leaving the Tower of London and travelling to Kensington Palace with a linked ticket, or taking a shuttle from a museum to its garden site.
Transfer at this station
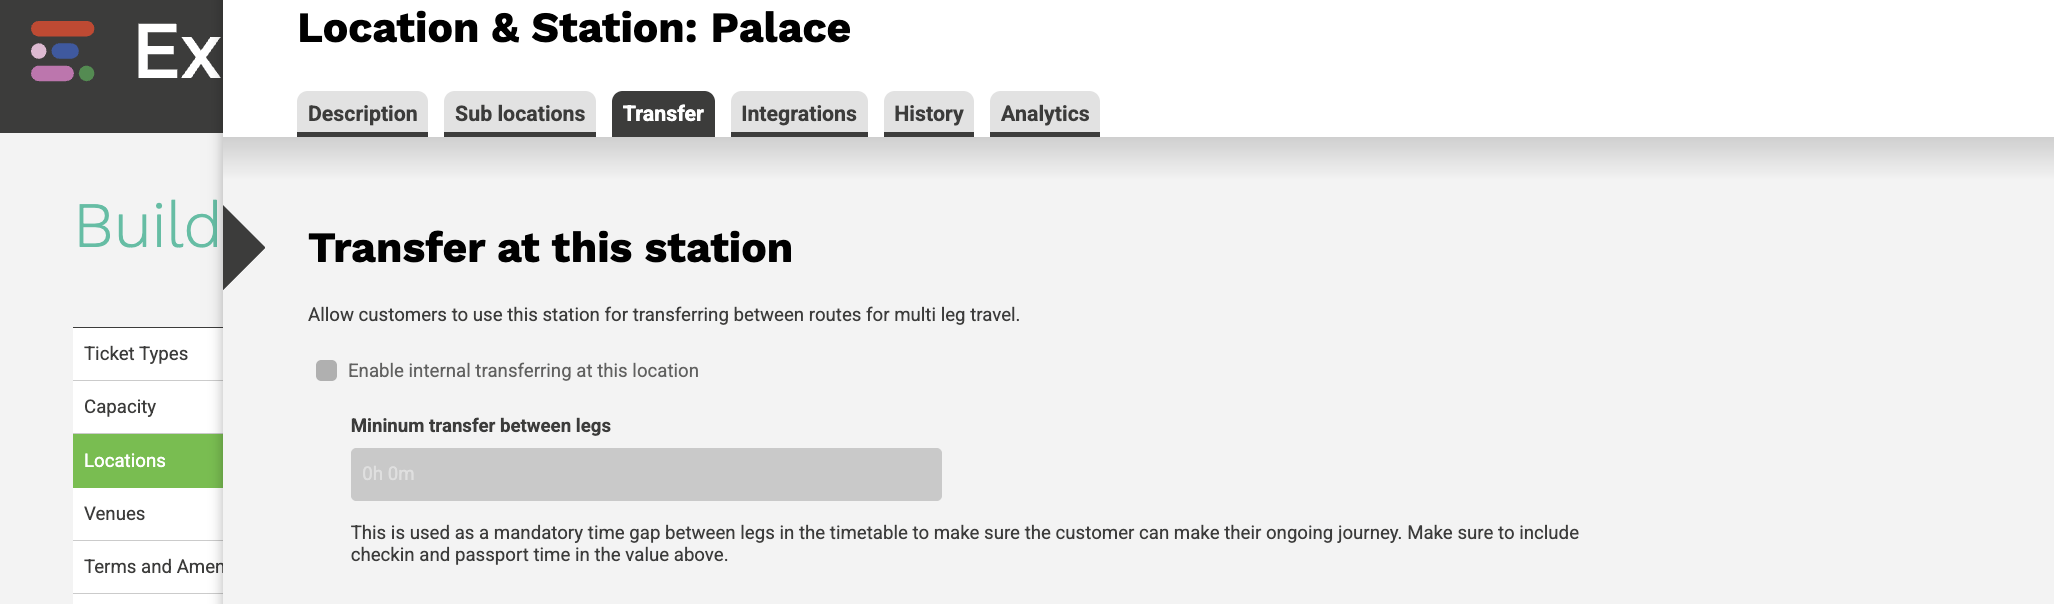
- Enable internal transferring at this station: at a location allows it to function as a station or stopover between connected routes or venues.
- Minimum transfer between legs: specifies the mandatory time gap between connected timetable legs to ensure the customer can complete check-in or travel before the next leg begins. NOTE: Include all required processing times (e.g., passport control, vehicle loading, or site entry) when setting this value.
Transfer via another station
The Transfer via another station section allows customers to continue their journey between connected locations using an alternative means of travel such as walking, driving, or public transport.
Transfers link multiple routes, stations, or attractions so that customers can move smoothly from one to another within a single booking or itinerary.
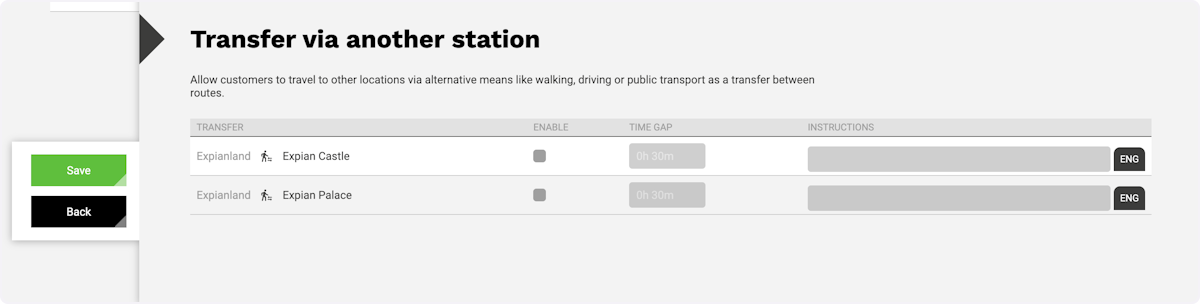
Transfers are defined at the location level, linking one site to another.
- Enable: activates the connection between two points.
- Time gap: defines the estimated transfer time (e.g., 30 minutes for a walk or shuttle journey).
- Instructions: optional field for traveller guidance, such as 'Exit via Main Entrance' or 'Take shuttle from Stop 3.'
The time gap value helps ensure that the timetable and booking engine allow sufficient time for customers to complete the transfer before the next timed event or journey leg.
Attractions and Heritage Sites
- Transfers typically connect multiple venues owned or managed by the same organisation, allowing visitors to travel seamlessly between them under one booking.
- Example: a visitor can travel from Palace to City Hall with a linked ticket and receive transfer details such as '15-minute walk from the south gate' or 'Shuttle every 30 minutes from Main Entrance.'
- These transfers are especially useful for organisations like Historic Royal Palaces or heritage trusts managing multiple nearby attractions.
Ferries and Transport Operators
- Transfers connect stations, ports, or terminals where passengers continue their journey via another route, ferry, or connecting mode of transport.
- Example: a customer arrives at Dover Port and transfers to Calais Terminal by ferry, or from Larne to Cairnryan using a connecting sailing.
- Time gaps help enforce realistic scheduling, for example, adding a 45-minute minimum between arrivals and departures to allow for check-in or vehicle unloading.
Intergrations Tab
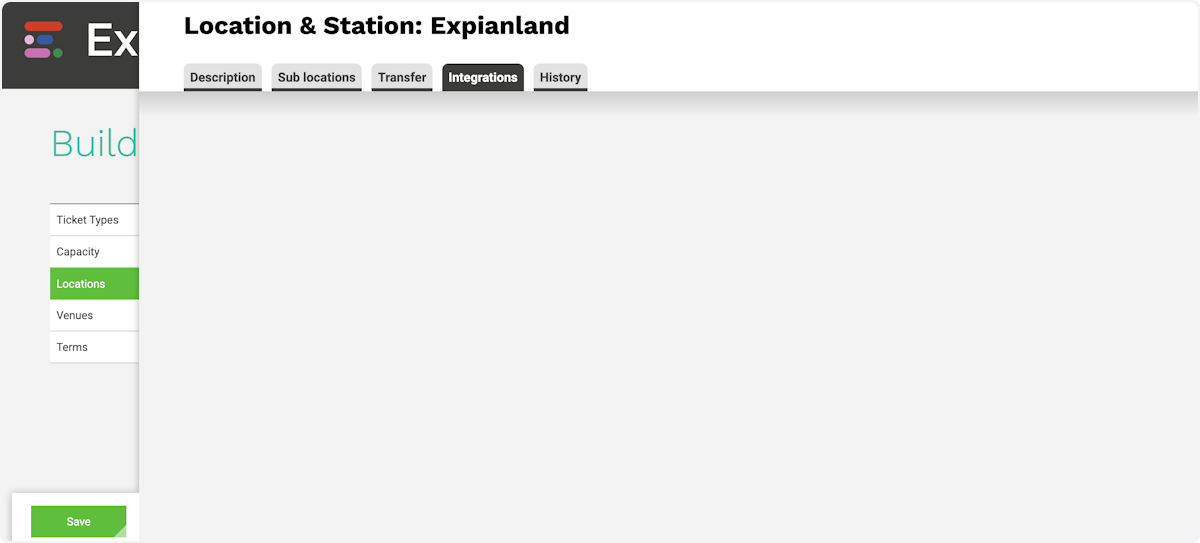
Add a Cost Centre Code and Account Code where applicable. IMAGE!
History Tab
Maintaining a clear edit history ensures full version control, supports accountability, and helps teams trace or roll back changes when reviewing data or configuration updates.
The History tab provides a record of all edits, publications, and republished versions for the selected item. It allows users to track who made changes, when they occurred, and what type of action was taken (e.g., edit, publish, republish).
Capacity → Capacity Types
Capacity Types determine how spaces are measured and controlled. They are required for Ticket Types, but could be set up at later stage, and then the Ticket Types could be updated.
Ticket Types and Capacity Types
Ticket Types define what customers can buy, such as Adult, Child, Family, Car, or Coach. Each ticket type can consume space from one or more Capacity Types, which determine how that space is measured and controlled.
The Link Between Ticket Types and Capacity Types
Capacity Types are the link to the physical measurement of space or occupancy that each Ticket Type uses. They ensure that available capacity within a venue, event, or vessel is accurately managed and that no overbooking occurs.
- In a ferry operation, capacity types might represent physical dimensions such as Low Vehicle Lane Metres, High Vehicle Lane Metres, or Foot Passenger Spaces. For example, a car ticket might consume 4.7 lane metres of space with a maximum height of 4m, while a coach might consume 12 lane metres and have a different height threshold.
- In an attraction or event, capacity types might represent Visitor Spaces, Wheelchair Access, or Family Admission. For example, a Wheelchair Access Ticket might consume two visitor spaces to account for the wheelchair size and to ensure comfort and accessibility for the visitor in a seated area.
These configurations ensure that capacity management remains accurate, safe, and adaptable, accommodating practical considerations such as vehicle dimensions, accessibility requirements, and visitor comfort.
Create a Capacity Type
- Click on the Capacity Types tab.
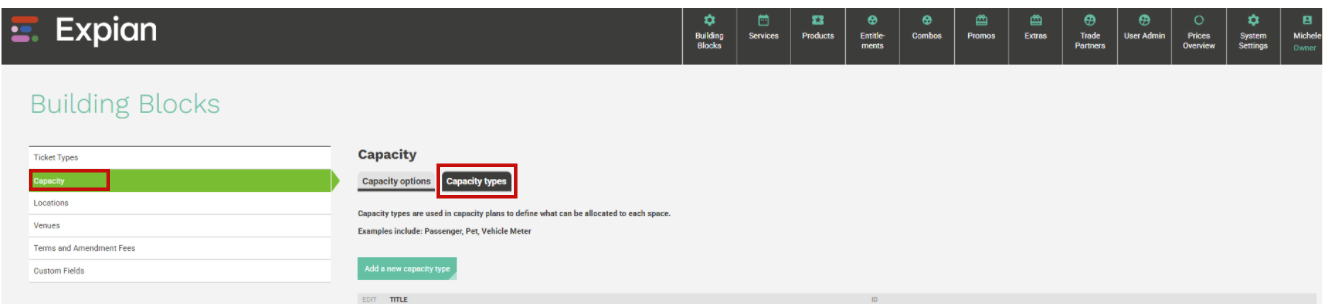
- Select Add a new capacity type.
- Complete the following fields:
- External ID: Required. Used as a unique identifier for integrations. Choose something user-friendly or that is required by the integrated system such as visitor, wheelchair_access or low-vehicle-metre.
- Label / Name: Enter a clear name describing what this type represents (e.g., Visitor, Wheelchair Access, Low Vehicle Lane Metre).
- Description: Optional. Add an internal note or description for reference.
- Fallback Capacity Type: Select one of the available options. A Fallback Capacity Type provides flexibility when a specific capacity type is sold out or when a defined measurement (such as vehicle height) exceeds a set threshold. It ensures that bookings can still be accepted by automatically drawing capacity from an alternative, compatible type, or the user can select 'Don't use Fallback Capacity Type' as shown in the example below
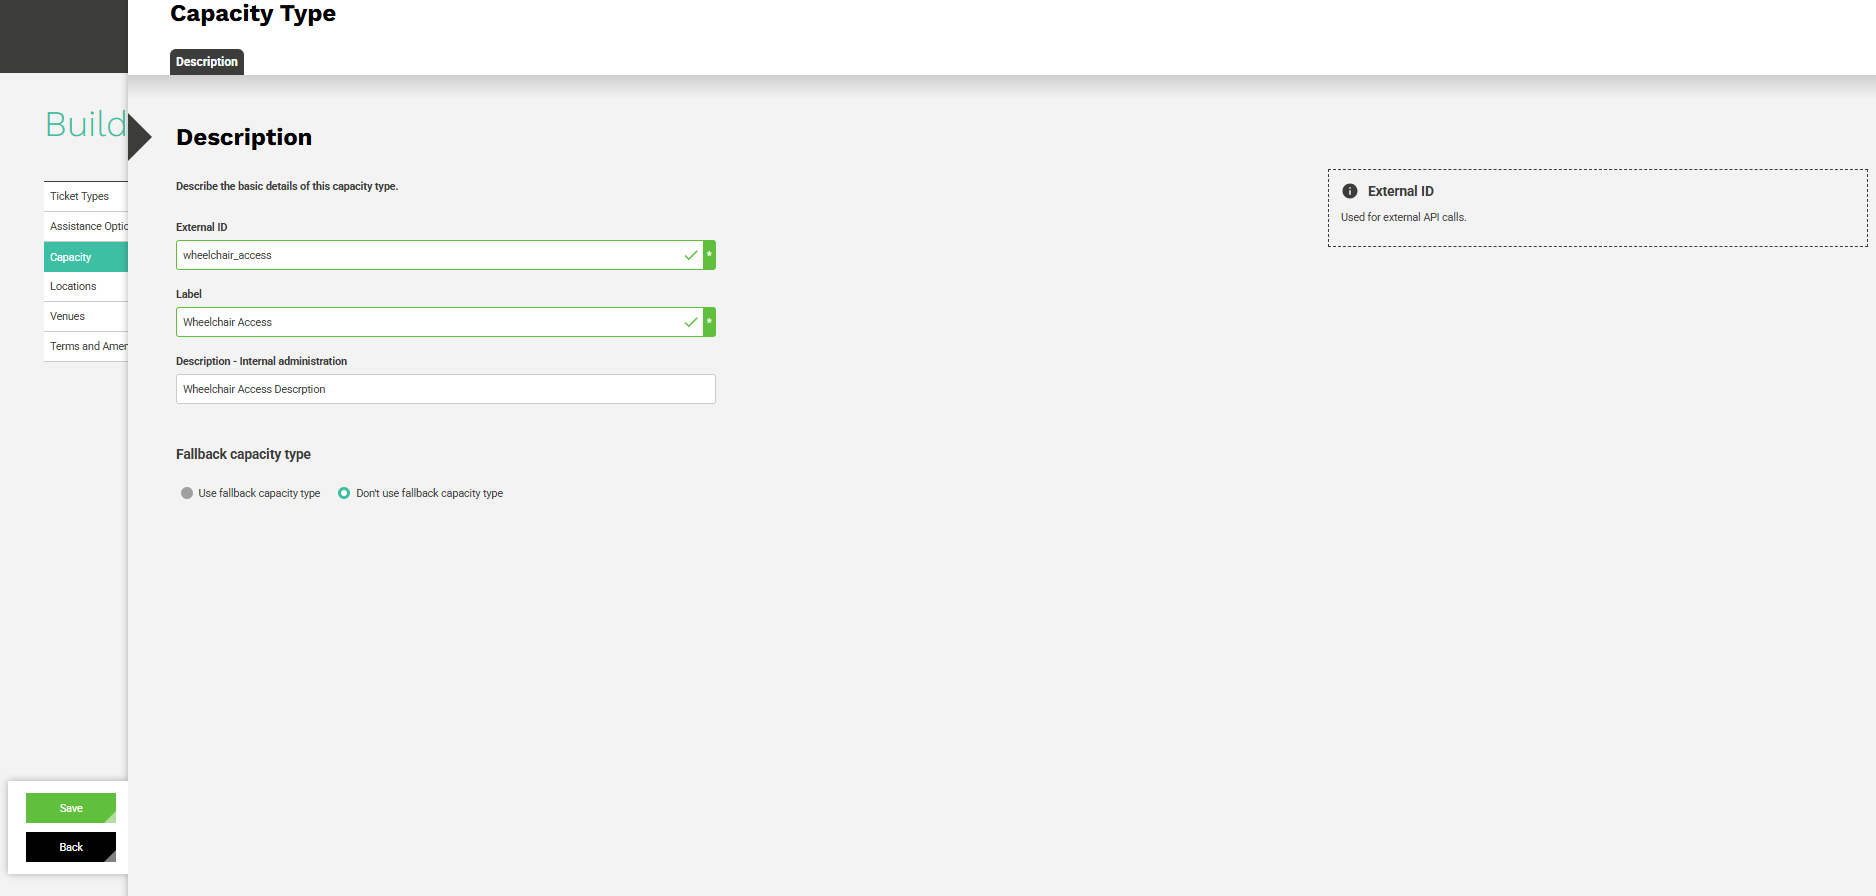
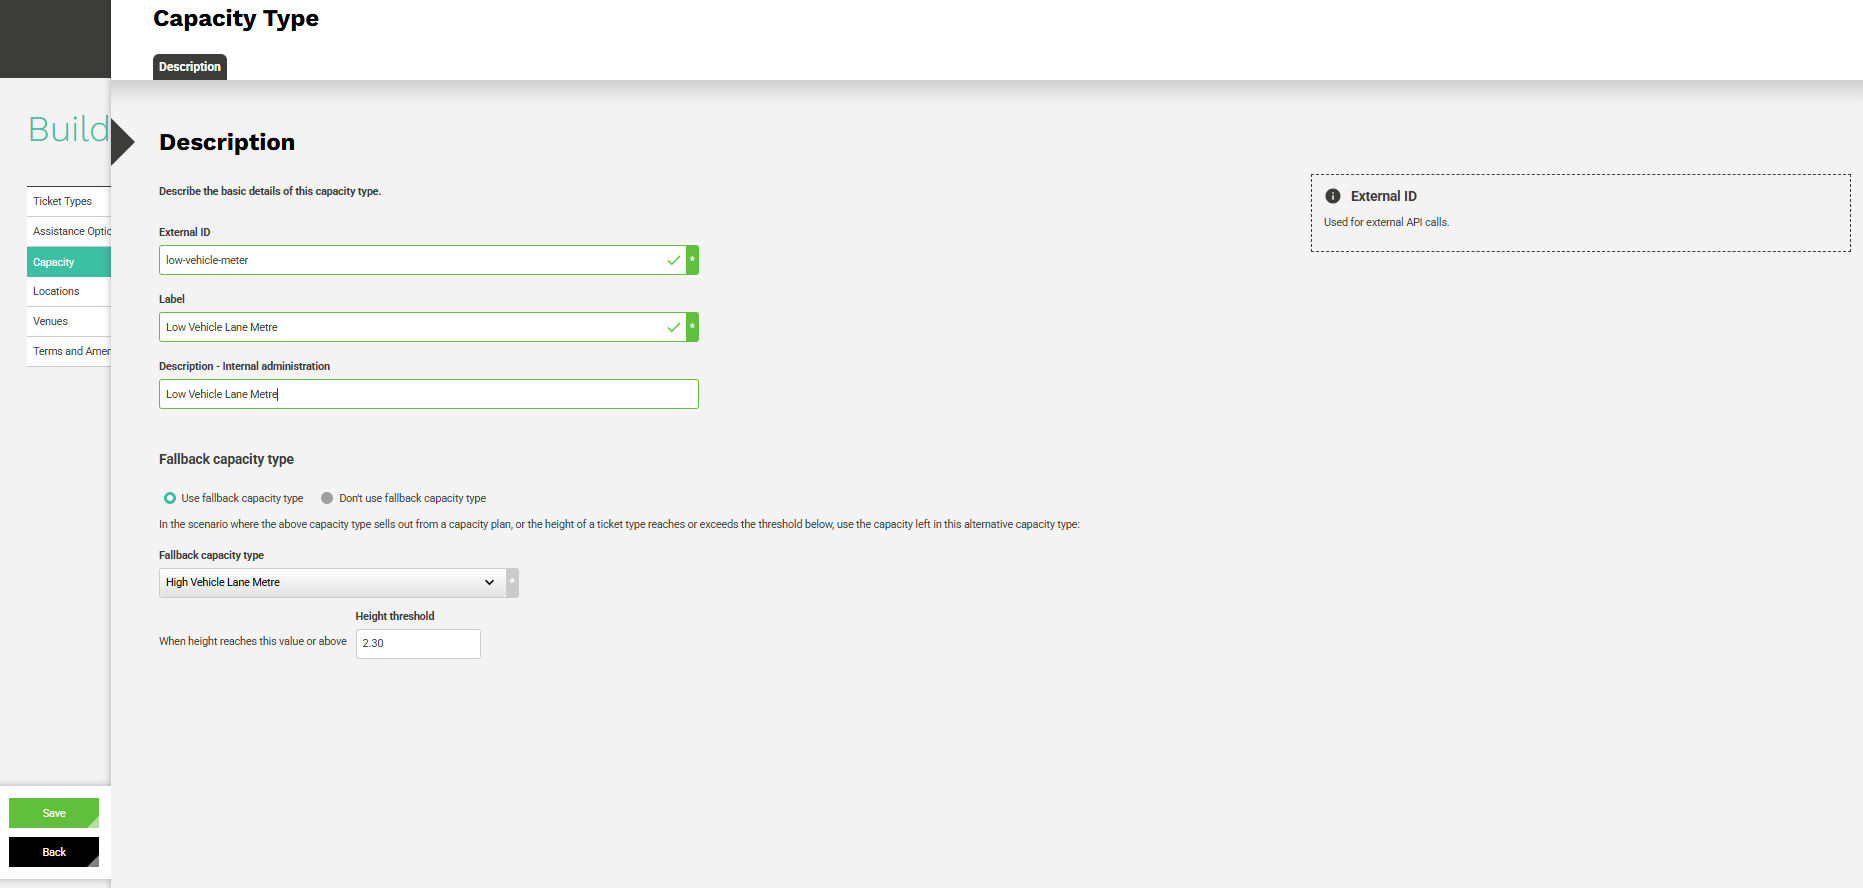
Here's an example for ferry travel with Fallback Capacity Type option selected:
- Select Use fallback capacity type.
- Choose the Fallback capacity type (e.g., High Vehicle Lane Metre).
- Set the Height threshold value, for example, 2.30 metres. When a vehicle meets or exceeds this height, it will consume capacity from the fallback type instead.
Linking Capacity Types and Capacity Options
Capacity Types are the foundation for all Capacity Options. They define the unit of measurement that determines how much space a booking consumes, for example, 1 visitor, 1 vehicle, or 1 berth.
Capacity Options then apply these types to describe how capacity is allocated and sold. Each option represents a specific physical or operational configuration, such as 2.4 Lane Metre Low for vehicles on a ferry, or Wheelchair Access for visitors requiring accessible seating.
By linking Capacity Types to Capacity Options, the system ensures that every ticket accurately consumes a measurable portion of total capacity, keeping allocations consistent across venues, events, and transport modes.
Example: Ferry Operations
In ferry environments, Capacity Types reflect measurable physical resources like Vehicle Lane Metres, Passenger Spaces, or Berths.
- A Low Vehicle Lane Metre Capacity Type defines one metre of deck space.
- The 2.4 Lane Metre Low-Capacity Option allocates 1 x Low Vehicle Lane Metre, enabling a vehicle ticket (such as Car) to consume the appropriate deck length, for instance, 4.7 m long and 1.8 m high.
- This ensures that deck space is correctly reserved for each vehicle and prevents overbooking.
Example: Attractions and Events
In attractions or events, Capacity Types are people-based, such as Visitor, Wheelchair Access, or Companion.
- A Visitor Capacity Type represents one guest entry.
- The Mobility Access Capacity Option could be allocated 2 x Visitor units, accounting where it is perhaps a seated event and requires a larger space for the wheelchair space and additional room for comfort and accessibility.
- This ensures accurate visitor counts and inclusive space planning for each booking.
Why This Link Matters
The connection between Capacity Types and Capacity Options ensures that:
- Allocations remain accurate: capacity is always tracked in measurable units.
- Flexibility is maintained: ticket types can consume different capacities depending on size, type, or accessibility.
- Safety and comfort are prioritised: ensuring compliance with space and accessibility standards.
- Reporting stays consistent: supporting both operational control and financial reconciliation.
Best Practice
- Use clear, standard naming conventions for External IDs, Location Codes, and Time Zones or integrations and analytics.
- Keep titles customer-friendly, but ensure internal references match integration standards.
- Align time zones and countries across all venues to prevent scheduling conflicts.
- Define Sub-locations only when operationally needed to avoid unnecessary complexity.
- Regularly review and update location hierarchies when new sites or routes are added.
- Group related capacities (e.g., Passenger vs. Vehicle) for simpler reporting.
- Use fallback capacity types to handle flexible operational needs (e.g., vehicle height).
- Define restrictions clearly to ensure incompatible ticket types or assistance options cannot overlap.
- Regularly audit capacity allocations against real-world limits for accuracy and safety.
Ticket Types
Ticket Types define the types of tickets available for sale, for example Adult, Child, Family, or Car, Van. They can represent entry tickets for attractions or transport allocations for travel operators.
They act as the connection point between the Assistance Options, Capacity Types, and Venues, determining what is being sold, who it is for, and what physical or operational space it consumes.
Each Ticket Type brings together multiple building blocks to create a complete, bookable product:
- Capacity Types define how much space or resource the ticket uses (e.g., one passenger seat or four lane metres of deck space).
- Assistance Options provide additional accessibility or service information that may influence ticket selection or handling.
- Mandatory Companions ensure that related tickets (such as Carer or Vehicle tickets) are correctly associated with the main purchase.
- Integrations manage how ticket data maps to external systems such as Ferry Gateway or third-party finance tools.
- Settings and Analytics control where the ticket is sold, how it can be purchased, and how performance is tracked.
Together, these configurations ensure every ticket type is correctly defined, operationally viable, and integrated into the wider booking and reporting ecosystem.
Ticket Groups
Ticket Groups are used to organise these tickets for customer purchase searches and to control which tickets can access specific venues, routes, or vehicles.
Create a Ticket Type Group
Ticket Type Groups help structure tickets by category or experience. For example, an attraction might group General Admission and Guided Tour tickets, while a ferry operator might group Passenger Tickets and Vehicle Tickets.
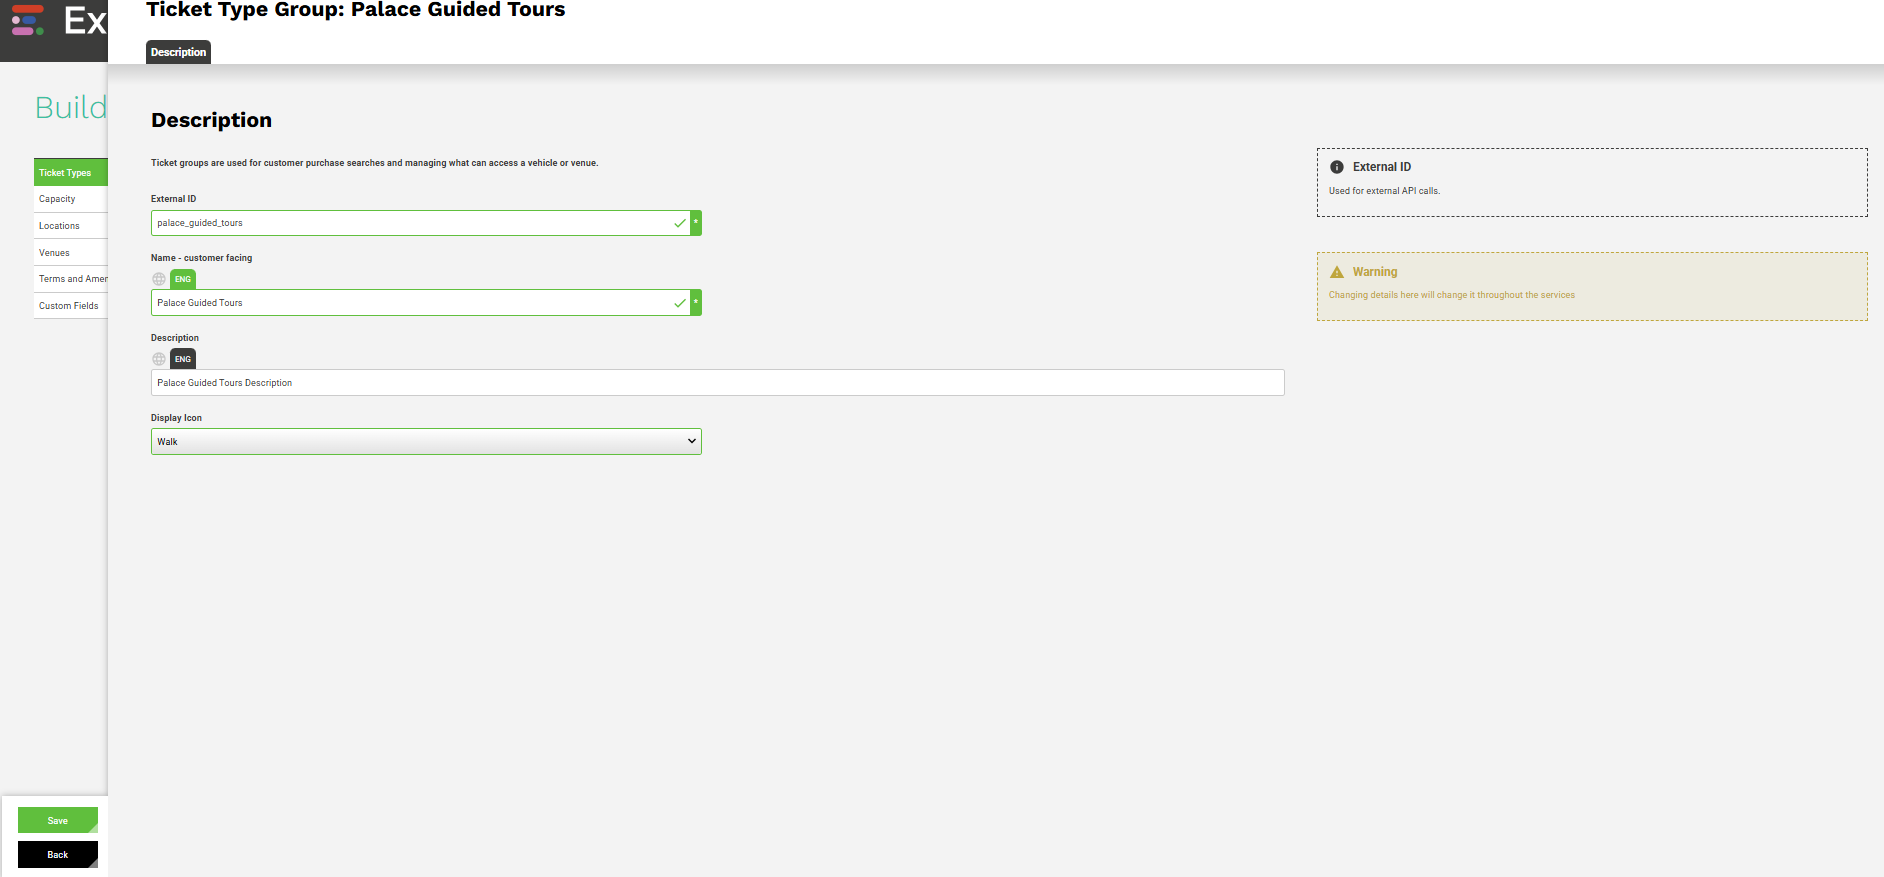
Create a Ticket Type Group:
- Navigate to Building Blocks → Ticket Types.
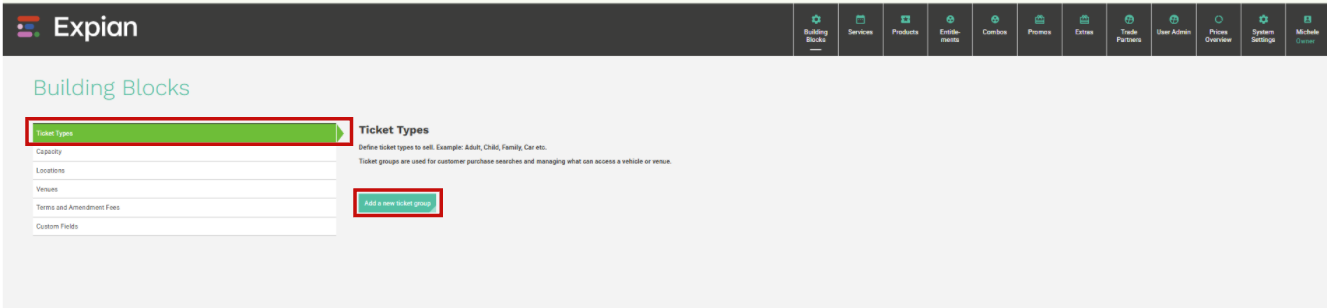
- Click Add a new ticket group.
- Complete the fields on the Description tab:
oExternal ID: Required. Used as a unique system identifier for external integrations (e.g., palace_guided_tours).
oName (Customer Facing): Enter the name that customers will see, such as Palace Guided Tours.
oDescription: Optional. Add a short description for internal or customer reference.
oDisplay Icon: Select an icon (e.g., Walk, Bus, or Ferry) to visually represent the ticket group in the booking journey.
- Click Save.
Once saved, your new group will appear in the list on the Ticket Types screen, ready for tickets to be added.
Add Ticket Types to a Group
Once the group has been created, you can begin adding individual Ticket Types to it. Each Ticket Type defines the specific ticket a customer can purchase.
- To add a Ticket Type expand your new group (e.g., Palace Guided Tours).
- Click Add a new ticket type.

Ticket Type → Description Tab
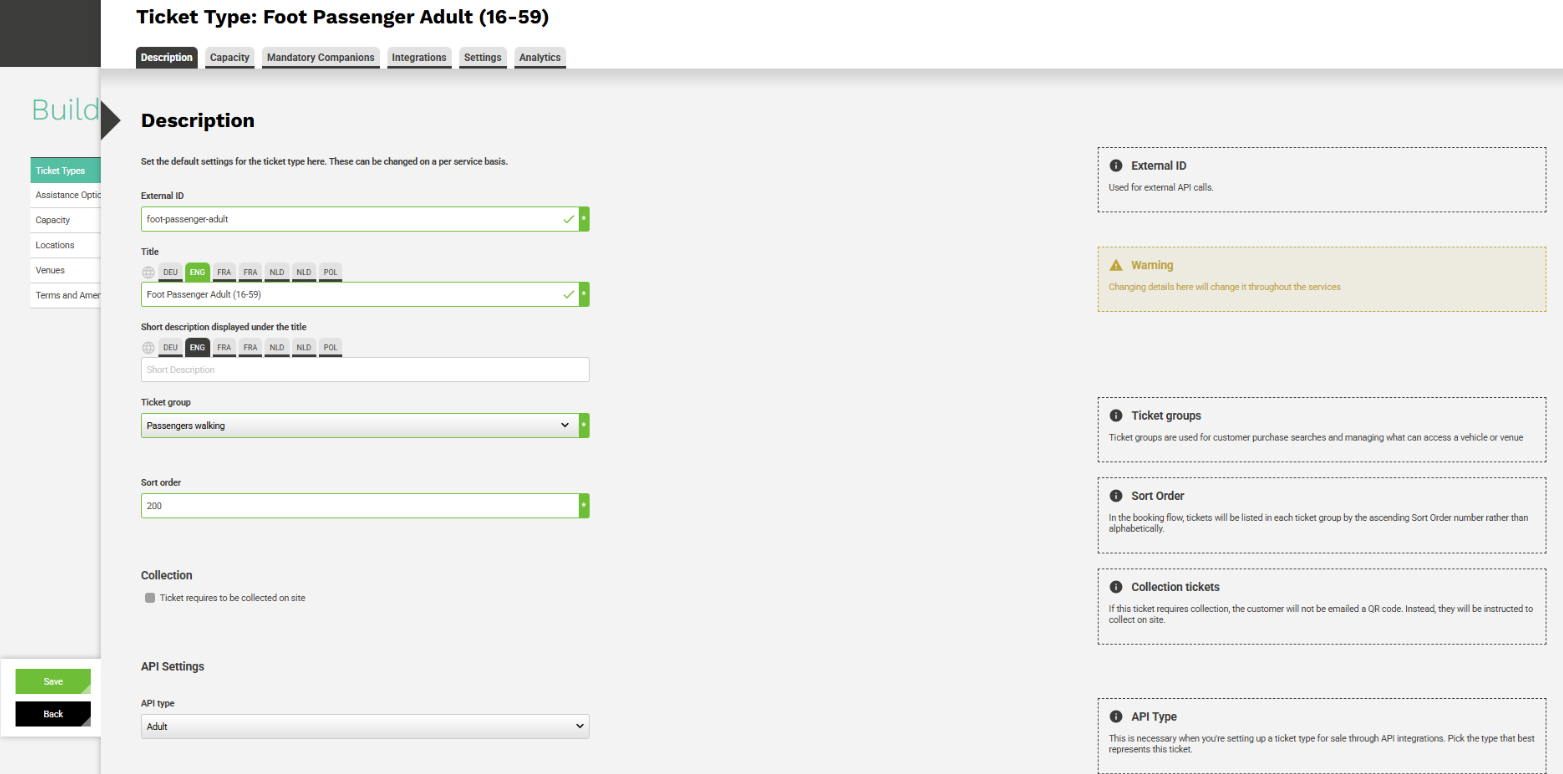
- Complete the fields on the Description tab:
oExternal ID: Required. A unique identifier for integrations (e.g., gt_pal_adult).
oTitle: The name of the ticket (e.g., Guided Tour at Palace – Adult).
oShort Description: Optional. Add a short summary for the ticket (e.g., Adult admission for guided tour).
oTicket Group: Select the group you created (e.g., Palace Guided Tours).
oSort Order: Determines the order in which this ticket appears in the booking flow.
oCollection: Tick if the ticket must be collected on-site instead of being issued digitally.
oAPI Type: Select the appropriate API type (e.g., Adult, Vehicle, etc.).
oMinimum / Maximum Age: If age-based restrictions apply, set them here. - Note: The Save button is initially greyed out until all required fields are completed
- Once complete, click Save.
Continue configuring the ticket type by moving through the additional tabs such as Capacity, Mandatory Companions, and Settings, to apply further rules, pricing, and restrictions.
Ticket Type → Capacity Tab
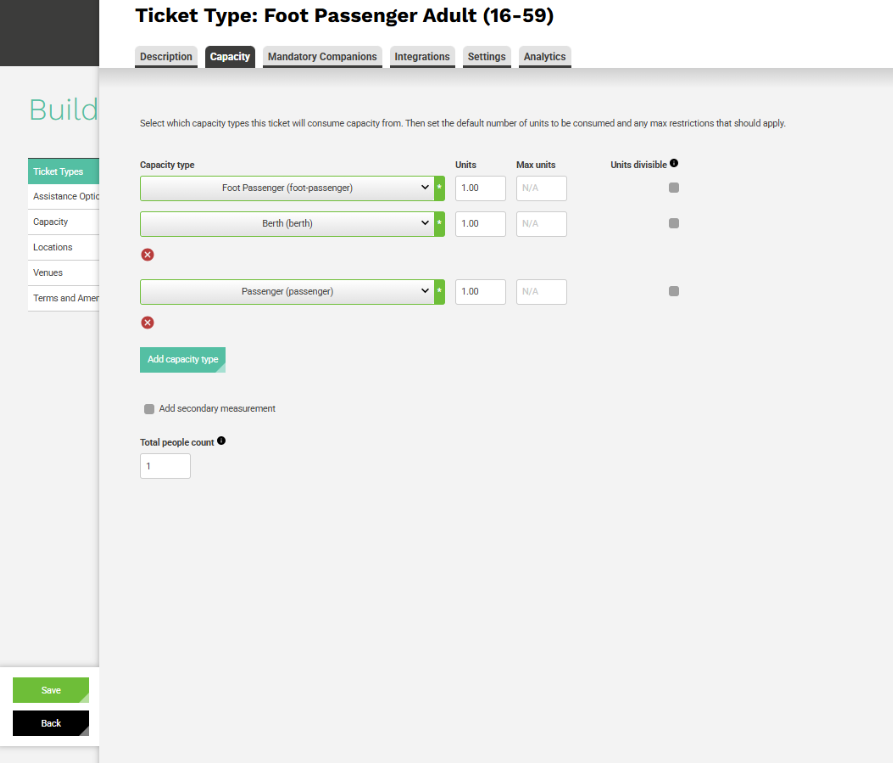
The Capacity tab determines how much capacity this ticket consumes from the system. Capacity represents a measurable limit, for example, seats, vehicle space, or standing room.
Each ticket type must be linked to one or more Capacity Types. The number of units defines how much of that capacity the ticket will use.
Complete the fields on the Capacity tab
- Capacity Type: Select one or more types (e.g., Foot Passenger, Berth, Passenger).
- Units: Defines the number of units consumed per ticket (e.g., 1.00 unit per metre).
- Max Units: Optional field for setting an upper limit.
- Units Divisible: when enabled, capacity can be split or shared (used mainly for vehicle or space-based capacities).
If your Capacity Type is 'Vehicle Lane Metres,' a Coach might consume exactly 12 units (metres). However, a Car might not be exactly 3 metres; it might be 4.7 metres. Enabling Units Divisible allows you to configure a Car Ticket Type to consume 4.7 units of space.
As both the Coach and the Car draw from the same ‘Lane Metre’ capacity pool, if a Coach does not book, those 10 meters remain available in the general pool.
As Units Divisible is on, the system can fit two 4.7m cars (9.4m total) into that available space, maximising the usage of the area that would otherwise have been taken by the coach.
When It Should Be Enabled
- When the client needs customers or staff to enter fractions of a unit, e.g.:
- Metered spaces
- Parking hours sold in 0.5 increments
- Venue hire per 0.25 hours
When It Should Not Be Enabled
- Standard admission tickets
- Memberships
- Fixed-quantity products
- Anything where the system must enforce whole numbers
- Add Secondary Measurement: Enables tracking of additional dimensions, such as height or weight, if relevant.
- Total People Count: Used primarily in scenarios where people counts differ from ticket quantities (e.g., family passes).
This setup ensures accurate space and resource management across bookings, whether controlling deck metres for ferries or seat allocations in attractions.
Ticket Type → Mandatory Companions Tab
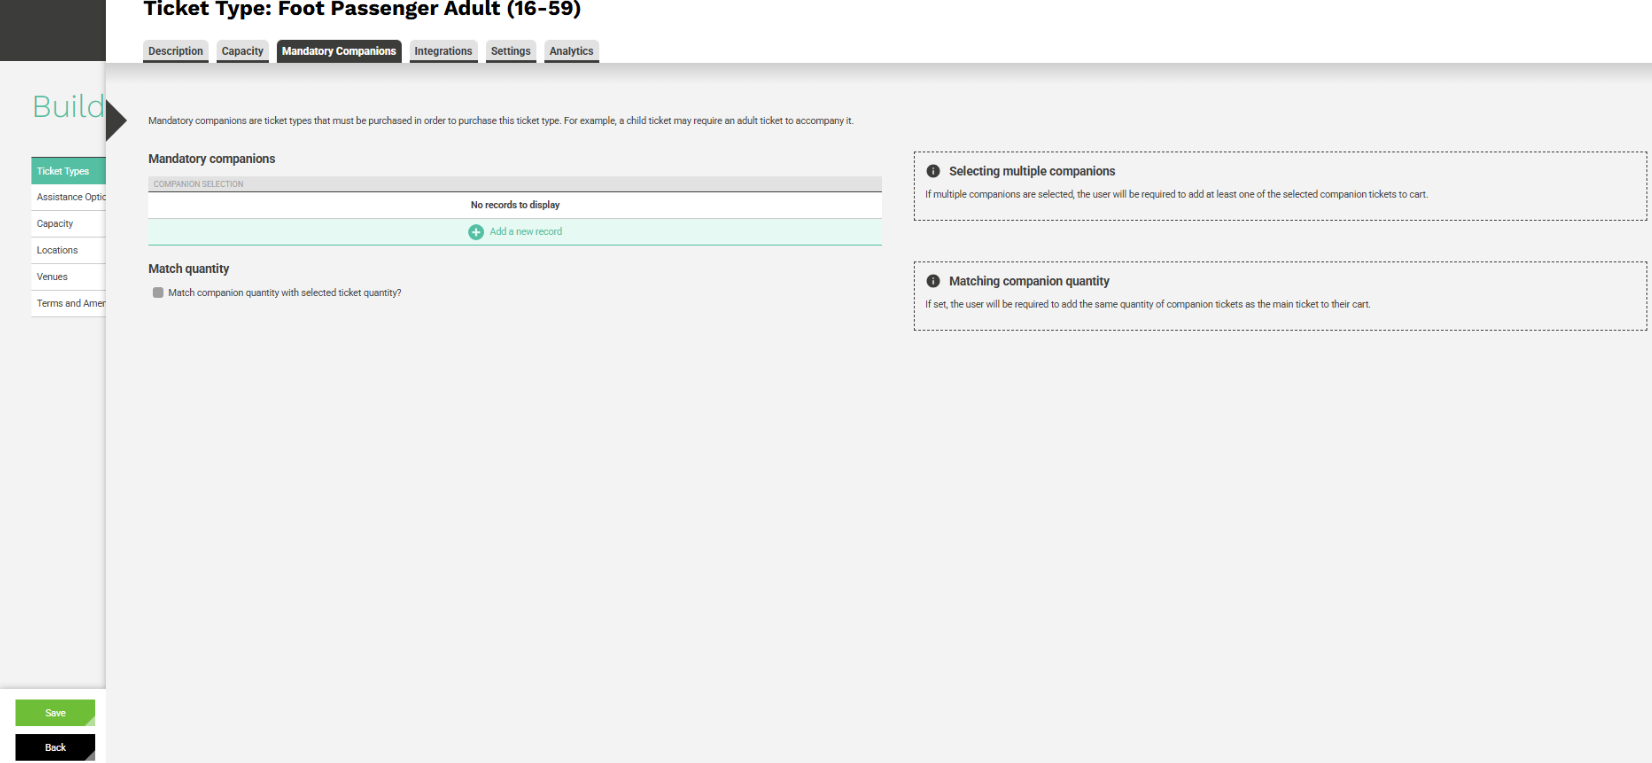
The Mandatory Companions tab allows you to define rules where specific tickets must be purchased together.
This is commonly used to ensure compliance with accessibility or pricing structures, for example, where a Carer or Companion ticket must accompany an Access ticket.
Complete the fields on the Mandatory Companions tab
Mandatory Companions: Lists ticket types that must be purchased alongside the main ticket.
Match Quantity: Ensures that companion tickets match the quantity of the primary ticket (e.g., one Carer per Access ticket).
Selecting Multiple Companions: If more than one companion option is set, the customer must select at least one to complete the purchase.
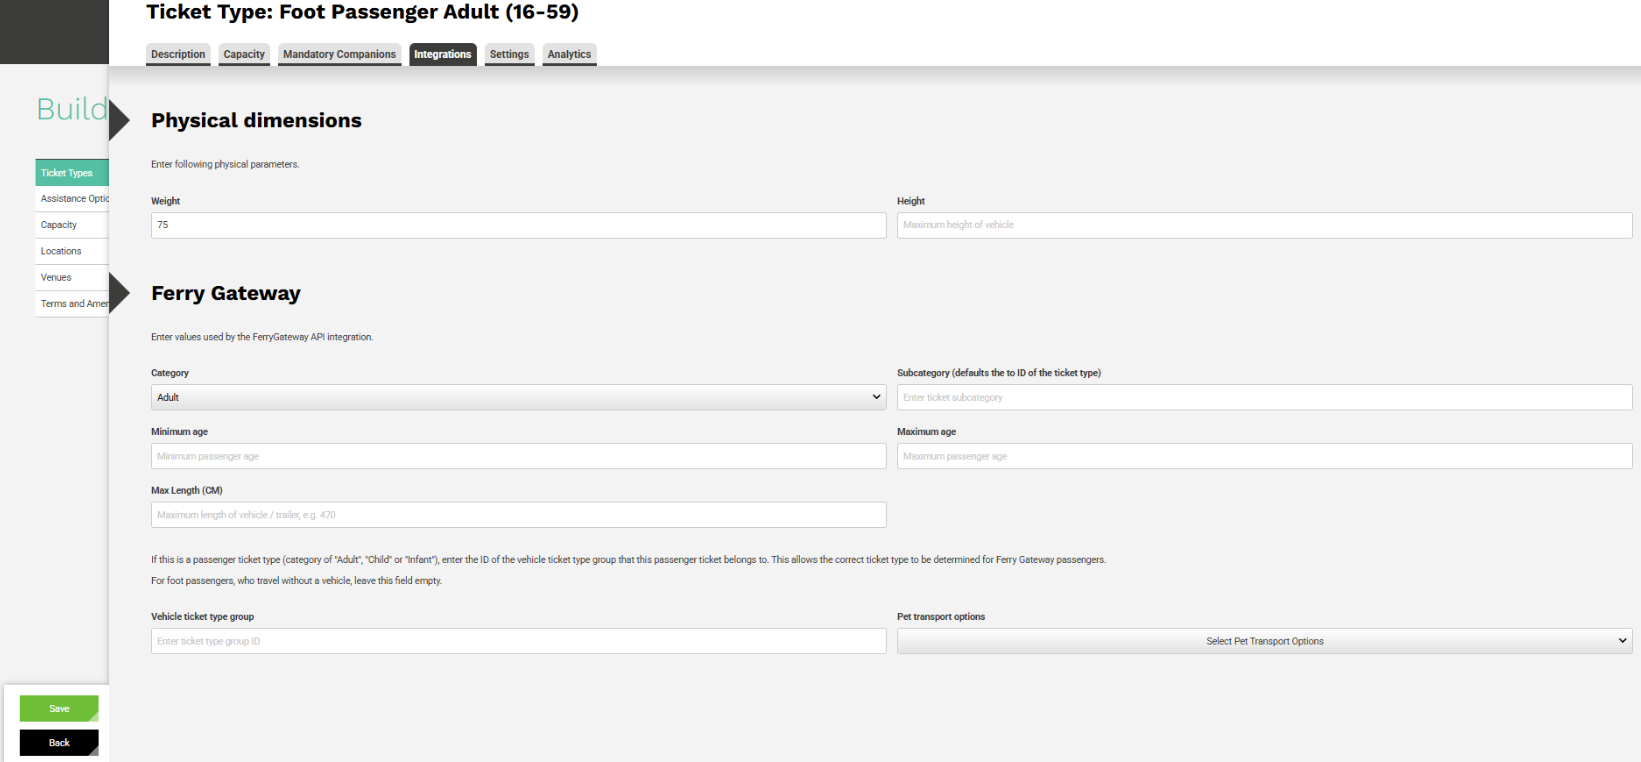
Ticket Type → Integrations Tab
The Integrations tab manages external system data mapping and physical ticketing logic.
In the Ferry configuration, this section includes physical dimensions (e.g., weight, height, and maximum vehicle length) and Ferry Gateway API fields, which map ticket attributes to the external ferry booking system.
Sections include:
- Physical Dimensions: Optional fields defining ticket-related physical metrics such as Weight or Height.
- Ferry Gateway: Used when linking to Ferry Gateway or other external systems.
Fields include:
- Category: (Adult, Child, Vehicle, etc.)
- Subcategory: (optional identifier)
- Minimum / Maximum Age
- Max Length (cm): relevant for vehicles or equipment
- Vehicle Ticket Type Group: associates passengers with their vehicles
- Pet Transport Options: maps pet-related bookings
Note: In some environments (e.g., Attractions), this tab may currently be blank or used for other integration references, such as finance.
Ticket Type → Settings Tab
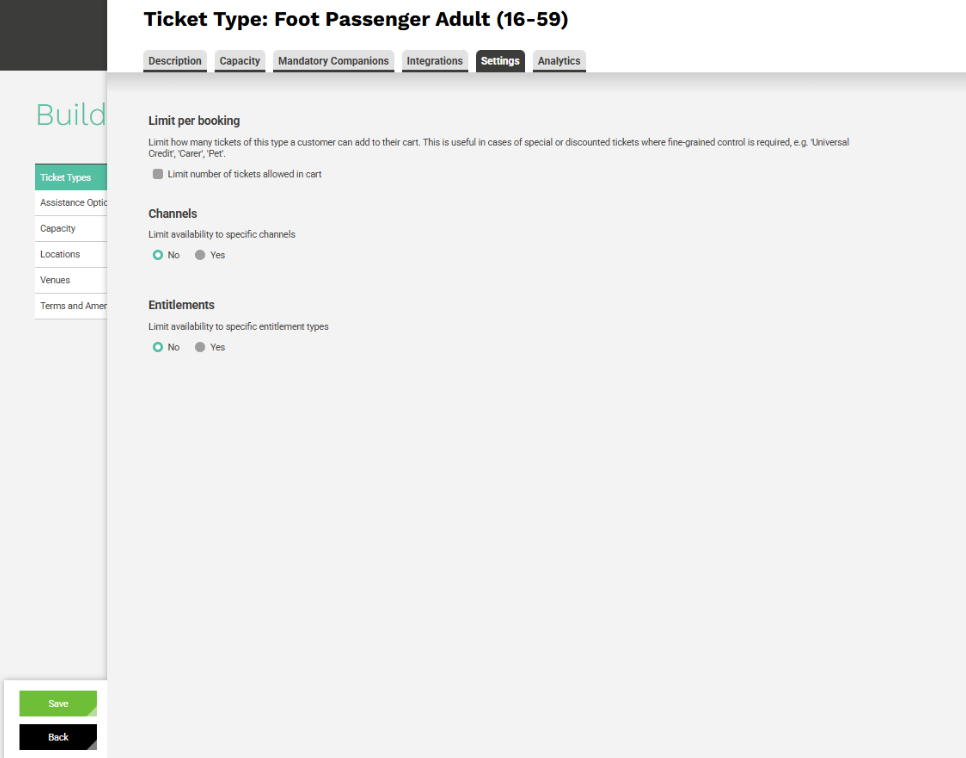
The Settings tab controls ticket availability and restrictions, allowing you to apply limits and configure rules for specific sales channels or customer types.
Available options:
Limit Per Booking: Restrict how many of this ticket can be added to a single cart (useful for discounted or special access tickets).
Channels: Limit ticket availability to specific channels (e.g., Online Only, Trade Partner).
Entitlements: Restrict ticket purchase to defined entitlement types (e.g., Members Only).
These settings provide flexibility in controlling availability while maintaining consistency across different booking scenarios.
Ticket Type → Analytics Tab
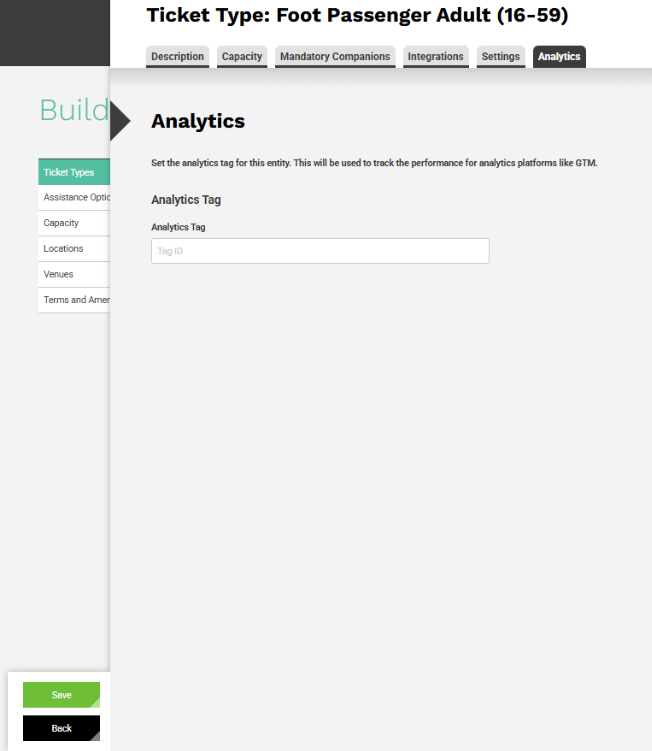
The Analytics tab allows tracking of ticket performance and sales activity through external analytics tools, such as Google Tag Manager (GTM).
Analytics Tag: A unique tag or tracking ID applied to the ticket type. This tag helps monitor booking trends, conversion rates, and customer behaviour across sales channels.
Best Practice: Managing Ticket Types
When creating or maintaining Ticket Types, consistency and structure are key. Each ticket acts as both a customer-facing product and a system reference, so clear naming and logical configuration ensure smooth operation across venues, integrations, and reporting.
Best Practices:
- Use clear, descriptive titles:e.g., Foot Passenger Adult (16–59) or Family Admission (2 Adults + 2 Children).
- Keep External IDs short and meaningful: avoid spaces or special characters (e.g.,
foot-passenger-adult). - Group tickets logically: by purpose or transport type (e.g., Passengers Walking, Vehicles, Attractions).
- Maintain naming consistency: across languages to support multi-lingual displays and API references.
- Review linked capacities and companions: regularly to ensure accurate space allocation and pricing rules.
- Avoid duplication: when a similar product is required, clone an existing ticket and adjust relevant parameters.
- Document dependencies: (e.g., linked Assistance Options, Integrations, or Entitlements) to support governance and auditing.
Following these practices ensures that Ticket Types remain easy to manage, traceable across systems, and adaptable to future updates within the platform.
Assistance OptionsIMAGES REQUIRED
- Assistance Options are customer-selectable accessibility or support flags that help define special requirements during the booking process.
- They ensure that customers with additional needs, such as mobility assistance or medical considerations, can be accurately accommodated. These options also inform capacity selection and operational handling, allowing staff and systems to prepare appropriately.
Examples include:
- Blind
- Blind and Deaf
- Electric Wheelchair
- Medical Equipment
- Medication
- Power Required
- Walking Difficulties
- Wheelchair
When a customer selects an assistance option during booking, the system records it against their ticket or booking profile. This data can then:
- Inform Capacity Selection: Certain assistance options can automatically influence capacity allocation.
- For example, a customer selecting Electric Wheelchair may trigger the use of a Mobility Access Capacity Type, ensuring adequate space on a ferry deck or in a seating area.
- Support Operational Planning: Staff can prepare boarding assistance, accessible seating, or dedicated zones in advance.
Enhance Reporting and Service Quality: Operators can monitor accessibility demand and ensure compliance with accessibility standards.
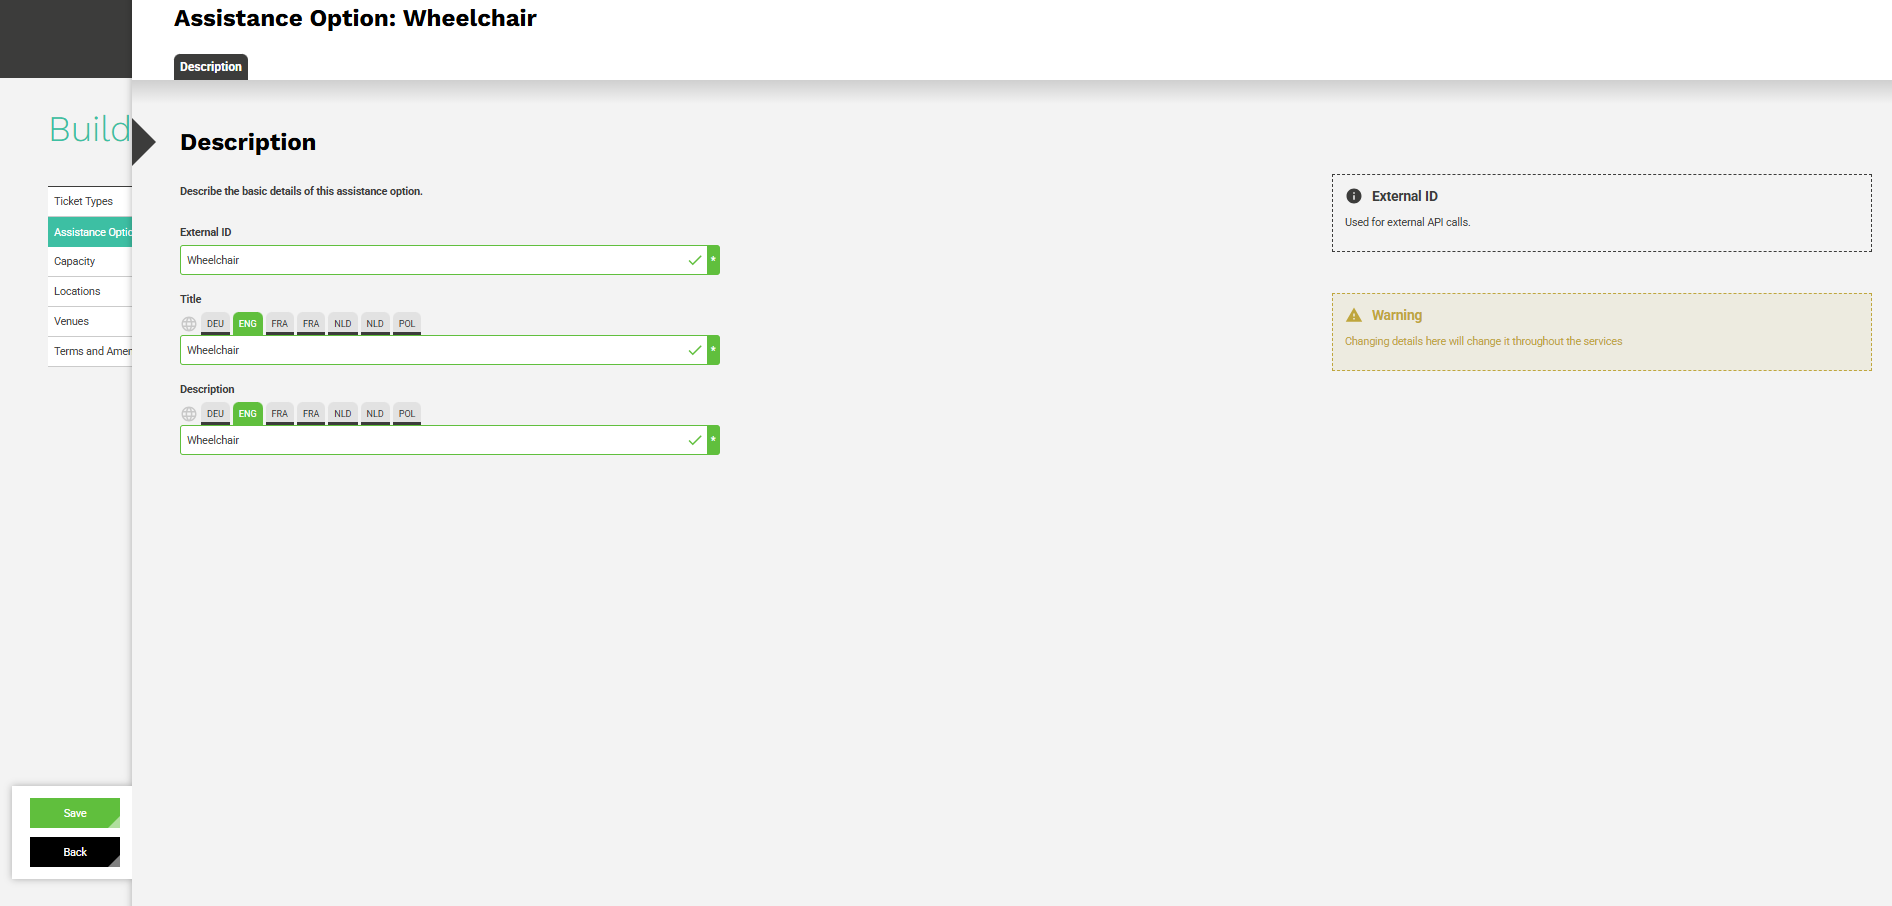
Create or Edit an Assistance Option
Click Add a new assistance option.
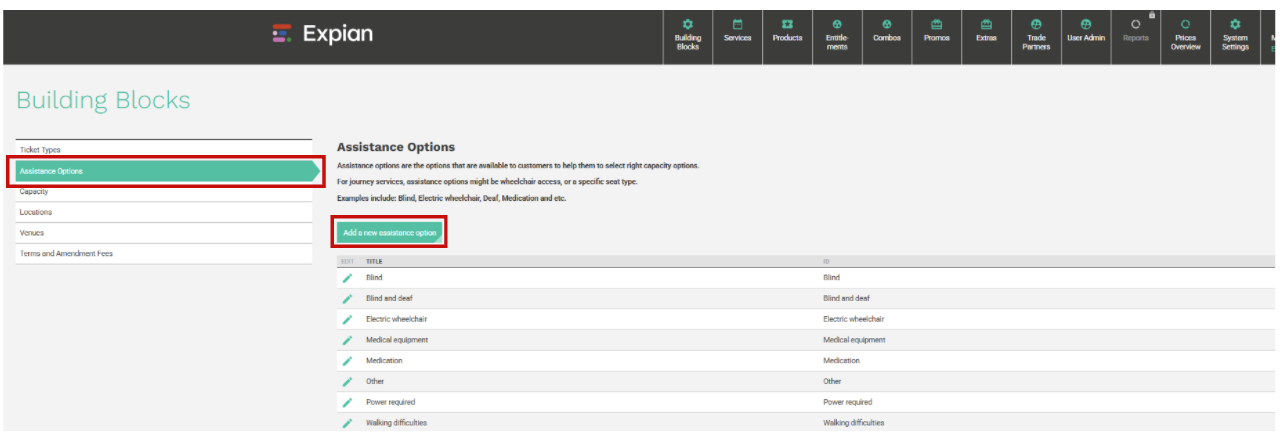
- Complete the following fields:
- External ID: Used for API integrations or external systems.
- Title: Customer-facing label (e.g., Wheelchair).
- Description: Optional internal or multi-language description.
- Select Save to apply changes.
Best Practices
To ensure Assistance Options are clear, consistent, and operationally effective, consider the following best practices:
- Keep the list concise and meaningful: Avoid duplicating similar options (e.g., Wheelchair and Electric Wheelchair may be distinct, but Mobility Aid could create confusion).
- Use customer-friendly language: Labels should be easy to understand without needing technical or medical knowledge.
- Align with accessibility standards: Where possible, mirror recognised accessibility categories such as those defined by the Equality Act or local transport guidelines.
- Plan for operational use: Each assistance option should have a clear process behind it (e.g., staff notification, dedicated space, or priority access).
- Review regularly: Revisit assistance options periodically to ensure they reflect real customer needs and are still in use across services.
- Support multi-language consistency: If multiple languages are enabled, ensure translations are accurate and culturally appropriate.
Capacity
The Capacity module defines how physical spaces, visitors, and vehicles are allocated within a venue or journey. It’s used across both Attractions and Ferries to determine who or what occupies a space and how many units that space contains.
For example:
- In Attractions, capacity may represent visitors within a venue area (e.g., 1 Adult Visitor = 1 space, Family Ticket = 4 spaces).
- In Ferries, capacity may represent available space on a vessel (e.g., 1 Passenger Seat, 1 Vehicle Lane Metre, or 1 Berth).
Each space in a Capacity Plan is defined by a Capacity Option, which describes the type of space or experience available, such as Standard Admission, Event Access, Vehicle Lane Metres, or Coach Capacity. Capacity Options are linked to Capacity Types, which determine how these spaces are measured and controlled. Capacity Types are described earlier in this document, in a section called, Capacity ==> Capacity Types in the Ticket Types section.
Capacity Option Groups
Capacity Option Groups are created to organise related Capacity Options under a single structure. They help manage different types of capacity within a venue or operation, for example, separating passenger, vehicle, or event-based capacities. Grouping Capacity Options ensures consistency in configuration, simplifies reporting, and allows operators to apply pricing, restrictions, and capacity limits in a structured and scalable way.
For example:
- A travel operator might create separate groups for Passenger Capacities and Vehicle Capacities.
- An attraction might create groups for General Admission, Guided Tours, or Special Events.
Using Capacity Option Groups keeps configurations organised, prevents overlap between unrelated capacities, and makes it easier to maintain accurate capacity management across multiple venues or transport types.
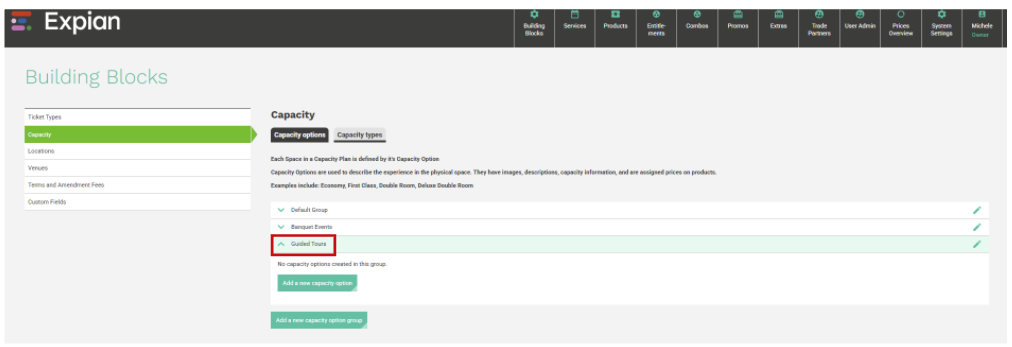
Each group appears in the Capacity Options list, where you can view, edit, or add new Capacity Options within that group as your operational needs evolve.
Capacity Option Groups
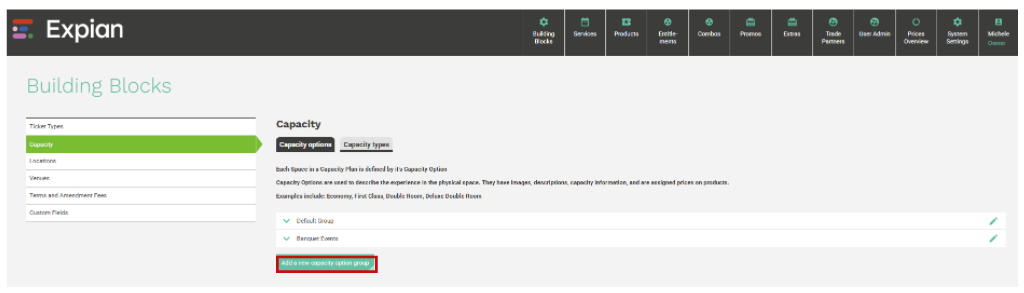
To Create a Capacity Type Group
- Navigate to Building Blocks → Capacity
- Click the Capacity types tab
- Select Add a new capacity type group
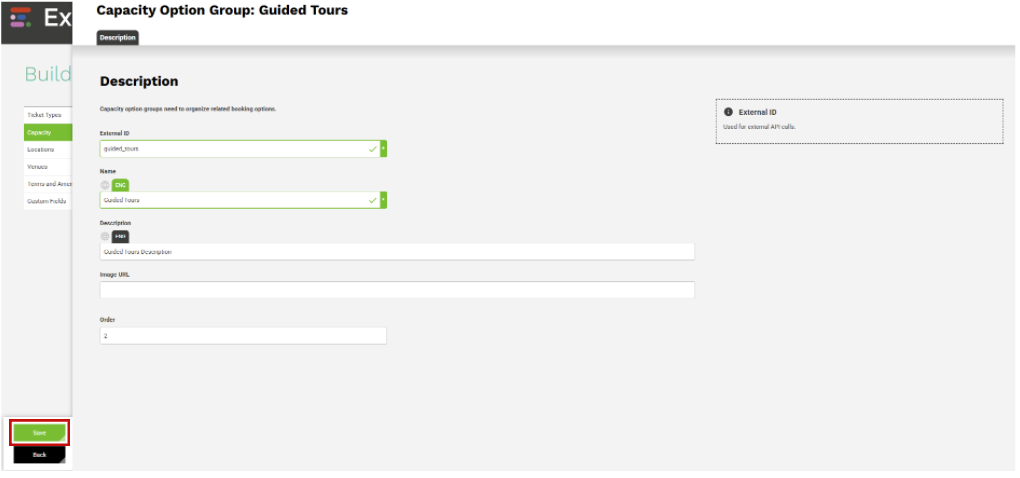
- Complete the required fields:
- External ID: A unique system identifier for integrations (e.g., passenger_types or vehicle_lane_metres).
- Name / Label: Enter a clear, descriptive name for the group (e.g., Passenger Types or Event Types).
- Description: Optional. Provide details about what this group represents or where it is used.
- Image URL: Optional. Add an image if this group needs to be visually represented in a front end interface
- Order:Define the display order if multiple groups exist.
- Click Save to create the group.
Your new Capacity Type Group will now appear in the list under the Capacity types tab. You can expand it to add new Capacity Types or edit existing ones within the group as your configuration grows.
Create a Capacity Option
- Click on the Capacity Options tab.
- Ensure that you have selected the appropriate Capacity Type Groupin this example Guided Tours
- Select Add a new capacity option.
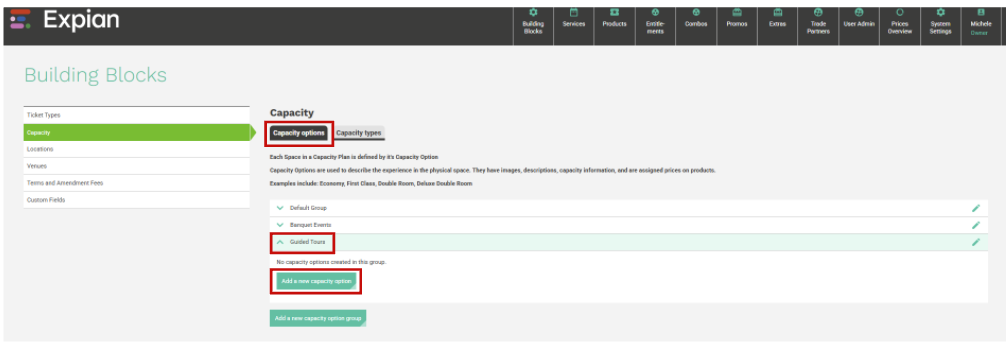
- Complete the fields on the Description tab:
- External ID: Required. A unique identifier used for integrations and reporting.
- Title / Name: The name of the Capacity Option (e.g., Standard Admission, Event Access, 2.4 Lane Metre Low).
- Image URL: Optional. Add an image to represent the space visually (useful for web display).
- Description: Optional. Describe the option (e.g., Standard entry for one visitor or Low vehicle lane metres for smaller cars or vans).
- Capacity Option Group: Select or create a group to organise related options (e.g., Default Group, 1 Resources, Standard Cabins).
- Always show in cart: Enable if this option should appear in the shopping cart even when free.
- Order: Define the display order for customer-facing or internal views if multiple options exist for a product.
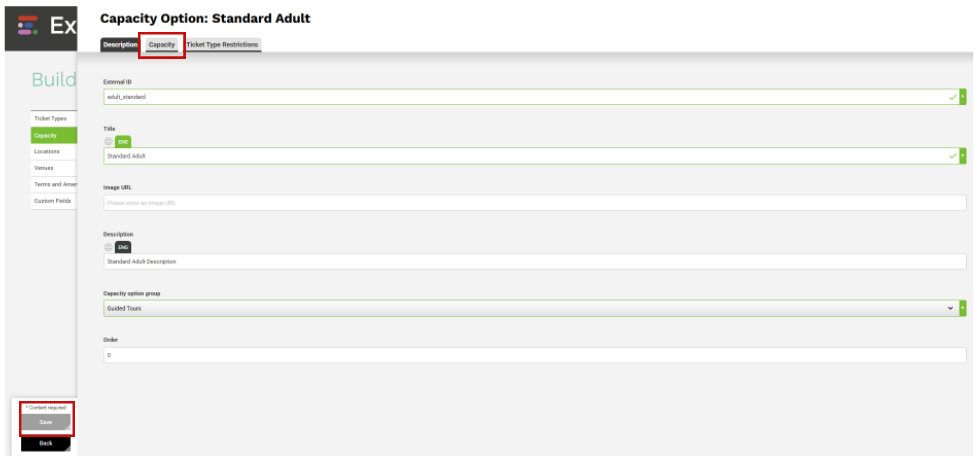
Setting Capacity
- Note that the 'Save' button is still greyed out, there are further Tabs that require completion.
- Select the Capacity tab.
- Define which Capacity Types this option accommodates, for example, Low Vehicle Lane Metre or Passenger.
- Specify the minimum and maximum units allowed (e.g., 1 to 1 for a single lane metre).
- Click Add Capacity Type to include more allocations if needed.
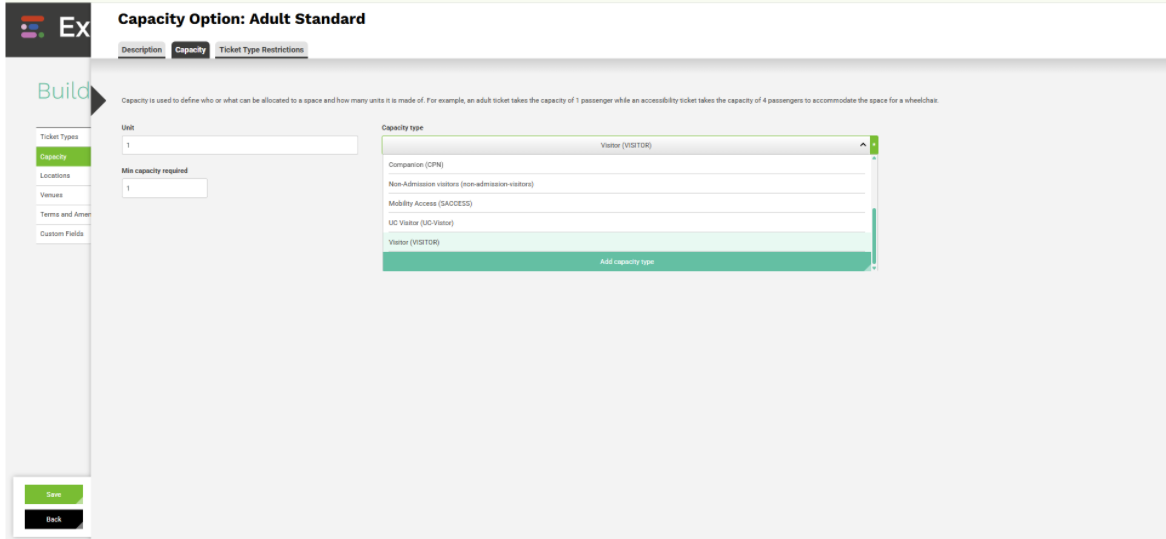
This ensures each Capacity Option is correctly linked to its Capacity Type and respects physical limits such as visitor numbers, berth counts, or lane metres available per sailing.
It is possible to click the green save button, at this point, however we have one more tab.
Applying Restrictions
The Restrictions tab allows you to control how and when a Capacity Option can be used. This is particularly valuable for ensuring accuracy across different visitor types or vehicle categories.
IMAGE
You can configure:
- Required Ticket Types: Ticket types that must be present for this capacity option to be available (e.g., Vehicle Ticket).
- Not Allowed Ticket Types: Ticket types that prevent the option from being used (e.g., Foot Passenger ticket cannot be combined with a vehicle lane).
- Required Assistance Options: Accessibility or service requirements that must be selected (e.g., Wheelchair Access).
- Not Allowed Assistance Options: Assistance options that make this capacity unavailable (e.g., Pets not allowed in Cabins).
IMAGE
These settings help maintain safety, compliance, and operational accuracy when managing complex ferry or attraction setups.
Example: Capacity Options and Types (Attractions)
In this example, the Default Group contains several Capacity Options used to manage different visitor or booking types within an attraction. Each option represents a unique way a space can be allocated, such as Standard Admission, Universal Credit, Event Access, or Car Parking.
IMAGE
These Capacity Options are linked to Capacity Types that determine their unit of measurement, for example, 1 x Visitor, 1 x Car, or 1 x Mobility Access. Capacity Options and Types are used when setting up Venues and Capacity Plans, ensuring each area (e.g., Main Hall, Garden, or Event Space) is assigned the correct type of capacity.
Grouping these options under a Default Group keeps configurations consistent, simplifies pricing, and maintains accuracy across all products and venues.
Example: Capacity Options and Types (Ferries)
In the 1 Resources group, each Capacity Option represents a physical space or resource available on board a ferry. For example:
- 2.4 Lane Metre Low and 4.8 Lane Metre High represent different vehicle deck configurations.
- Default Passenger Capacity defines the number of foot passengers permitted.
- Default Pet Capacity and Default Pet Lounge manage pet bookings in designated areas.
- Default Coach Capacity and Default Vehicle Capacity define allocations for larger vehicles.
IMAGE
By combining these Capacity Options into structured groups, ferry operators can manage multiple deck levels, cabin layouts, and vehicle categories while maintaining safe and balanced load distribution for each sailing.
Venues
Venues (including Capacity Management) enables operators to define and manage the physical spaces where activities, services, or journeys take place. A venue represents a physical space at a location, such as the Palace Gardens only, or the Palace and Gardens combined for attractions, or a Ferry or Train for travel operators. Capacity planning allows operators to assign limits to specific services or events at each venue or space, for example, setting a capacity of 1,200 visitors for general admission or 200 guests for a private evening tour, or defining how many passengers and/or vehicles can be booked per sailing. Capacities can be managed individually or in bulk, and grouped to support multiple configurations, such as different room layouts at a venue or multiple boats operating the same route. This flexibility ensures accurate availability, smooth operations, and an enhanced visitor or traveller experience.
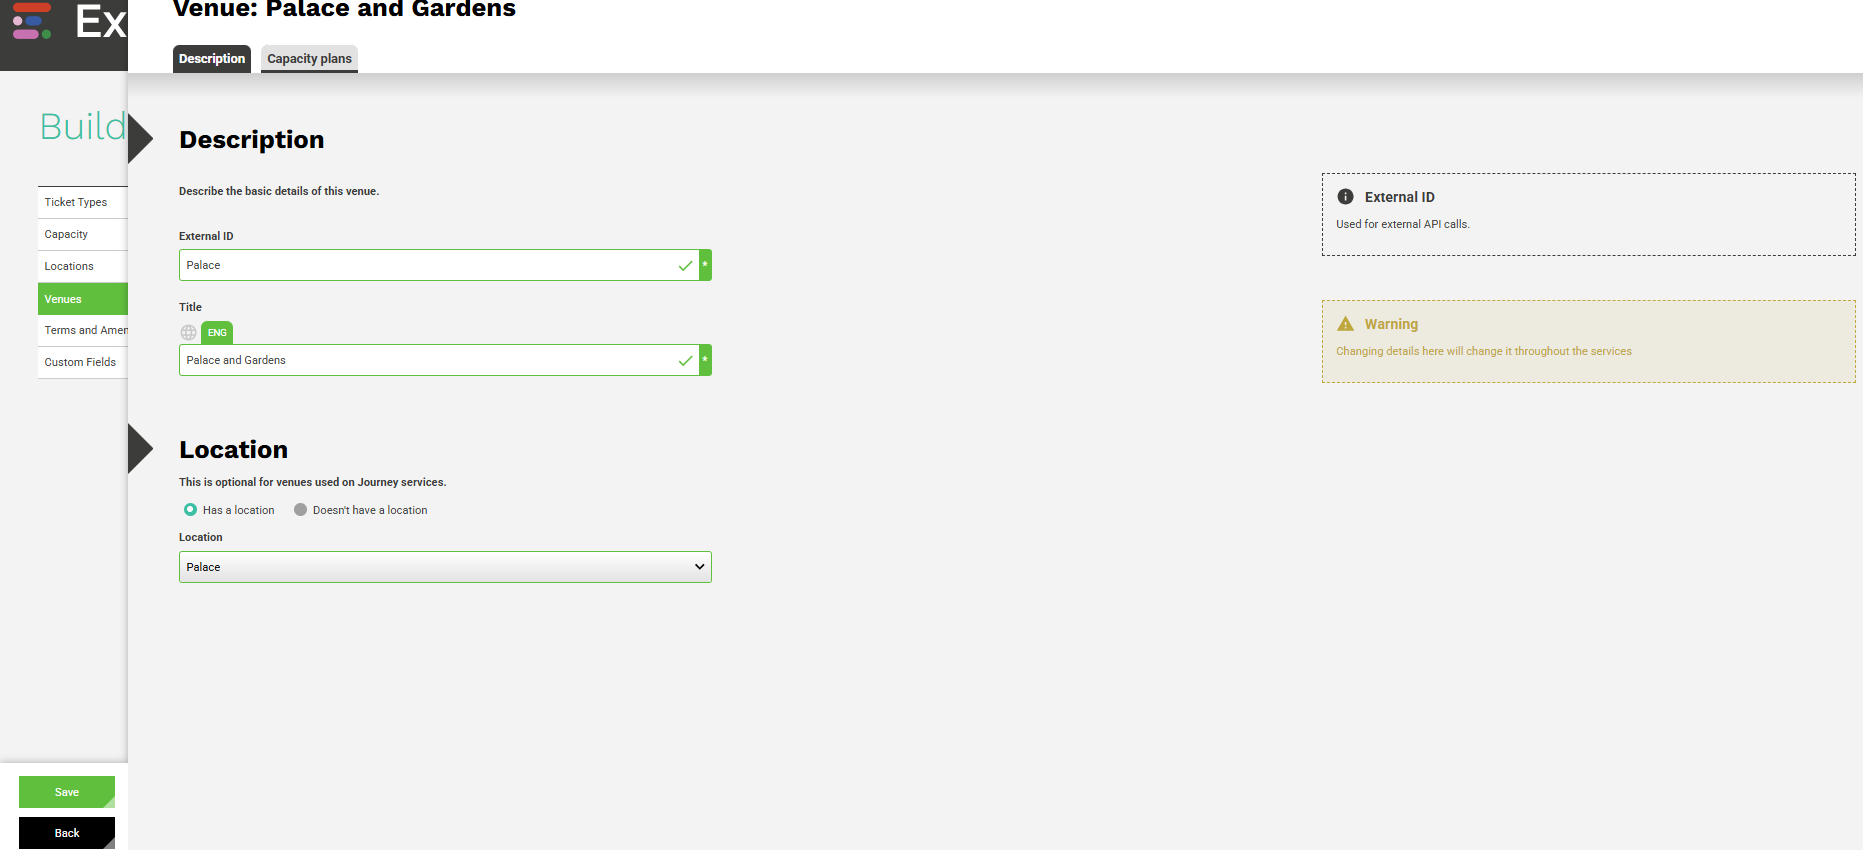
Navigate to the Venues in the building Blocks and select Add a new venue
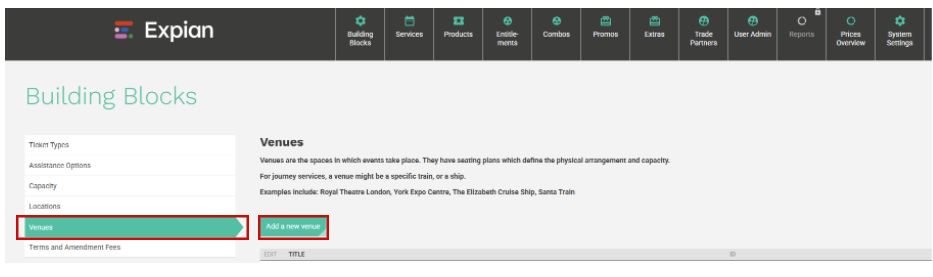
Venue Description
Fill in the Required Fields
- External ID: (Required). Used as a unique system identifier for external integrations (for example, with finance or CRM,). Choose an ID that’s user-friendly and easy to recognise, such as PLGN or a numeric code, depending on the integration you may use.
- Venue Title / Name: (Required) Enter the official name of the venue as it should appear across your system and reports, for example Palace and Gardens or Ferry Name.
- Location: Select whether the venue has an associated location. If it does, use the dropdown menu to choose the correct location from the list.
- Click Save to confirm your selections.
Capacity Plans
Select the Venue you have just created using the pencil icon

Click on Capacity plans and click on Add Capacity plans

Create a Capacity Plan
- Enter a Title
- Give your Capacity Plan a clear, descriptive name, for example, GA 2000 or Red Eagle Ferry 1 Sep–Oct.
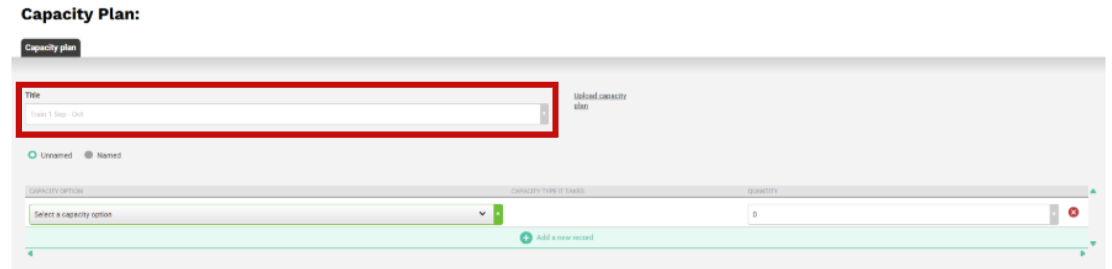
- Upload or Download a Capacity Plan (optional)
- Use Upload capacity plan to import data from an existing file.
- Use Download capacity plan to export the current configuration for review or backup.
When to Use Upload/Download
Uploading a capacity plan is useful when you need to create or update multiple capacity records at once, for example, importing seasonal or event-specific capacities directly from a spreadsheet. Downloading a capacity plan allows you to review, share, or edit existing capacity data offline, or to keep a backup before making bulk changes. This helps maintain consistency and saves time when managing large or frequently changing venues.

- Unnamed or Named (default Unnamed)
- Choose whether your Capacity Plan is Unnamed or Named:
- Named: for venues or events with allocated seating or numbered entries.
- Unnamed: for general admission or open-entry areas.
- Select Capacity Option
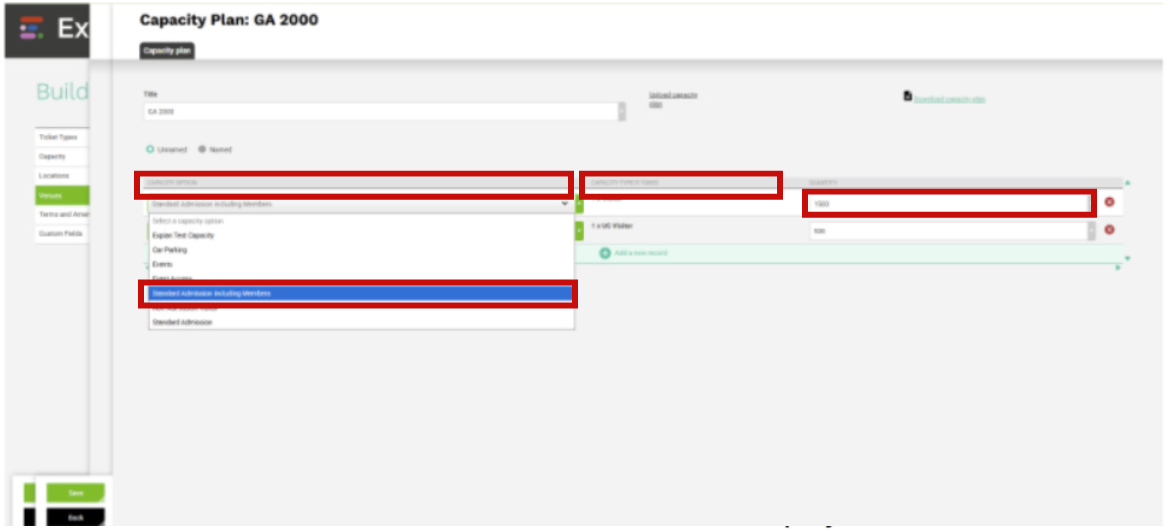
- From the dropdown list, choose the Capacity Option this plan will use, for example, Standard Admission including Members, Event Access, or Car Parking.
- Enter Quantity: In the Quantity field, enter the total number of spaces or visitors the plan allows, for example, 2000.
Make sure the combined total of all entries within this plan does not exceed the overall limit you’ve defined in the title (e.g.GA 2000 – General Admission).
- Add More Records (if required)
Click Add a new record to include multiple capacity types within the same plan, for example, 1 Adult: Visitor: 1500 and 1 Child Visitor: 500.
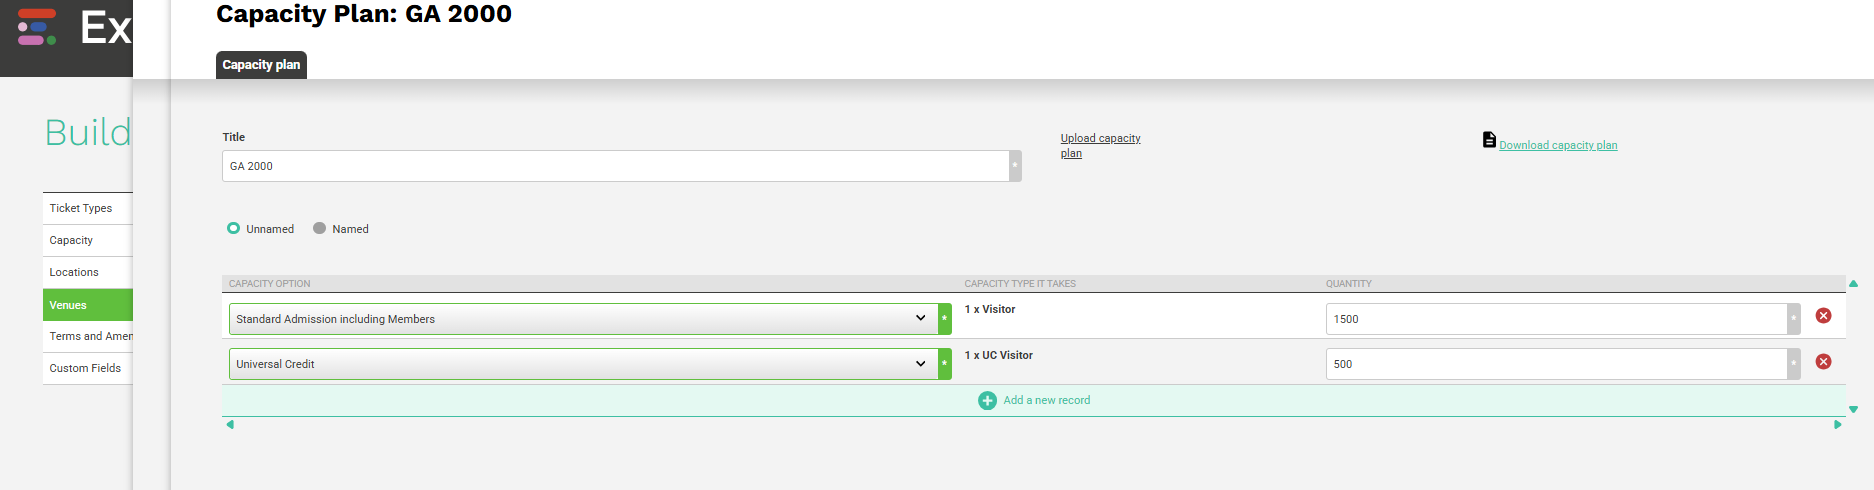
The combined quantities of all records should still match or remain within your plan’s stated total (e.g. 2000 in this example).
- Save the Plan
Additional Capacity Plans
You can continue setting up capacity plans for all of your admission limits (see below examples).
Create Capacity Plans
Your Venues Capacity plans all show in a list within your Venues 'Capacity plans' tab
You can keep adding to your capacity plans as and when required.
Example Capacity Plan (Ferry Travel)
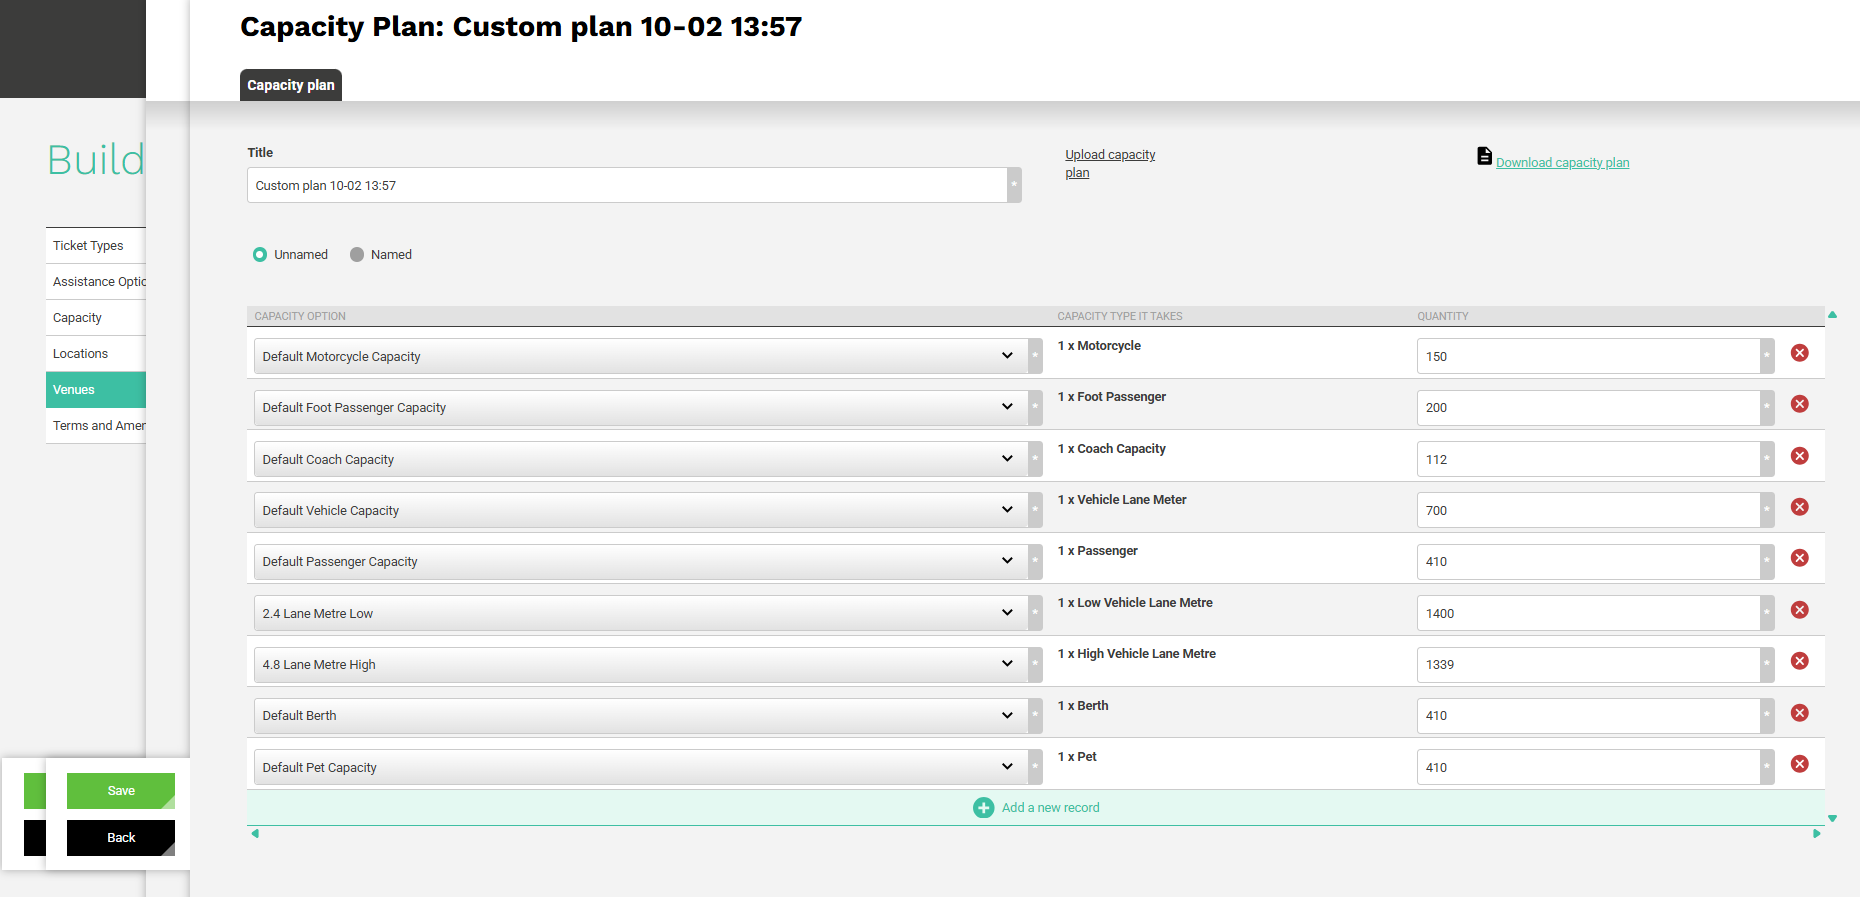
The Custom plan 10-02 13:57 example demonstrates how capacity planning is used in transport such as ferries. Each capacity type represents a different passenger or vehicle category on board, including motorcycles, foot passengers, coaches, vehicles, berths, pets, and lane metres for varying vehicle sizes. This detailed configuration allows operators to manage load distribution accurately, ensuring safe and efficient use of space on each sailing. By defining quantities for each category, for example, 410 berths, 700 vehicles, or 200- foot passengers, the plan provides a clear, real-time picture of total vessel capacity.
Example Capacity Plans Summary (Ferry Travel)
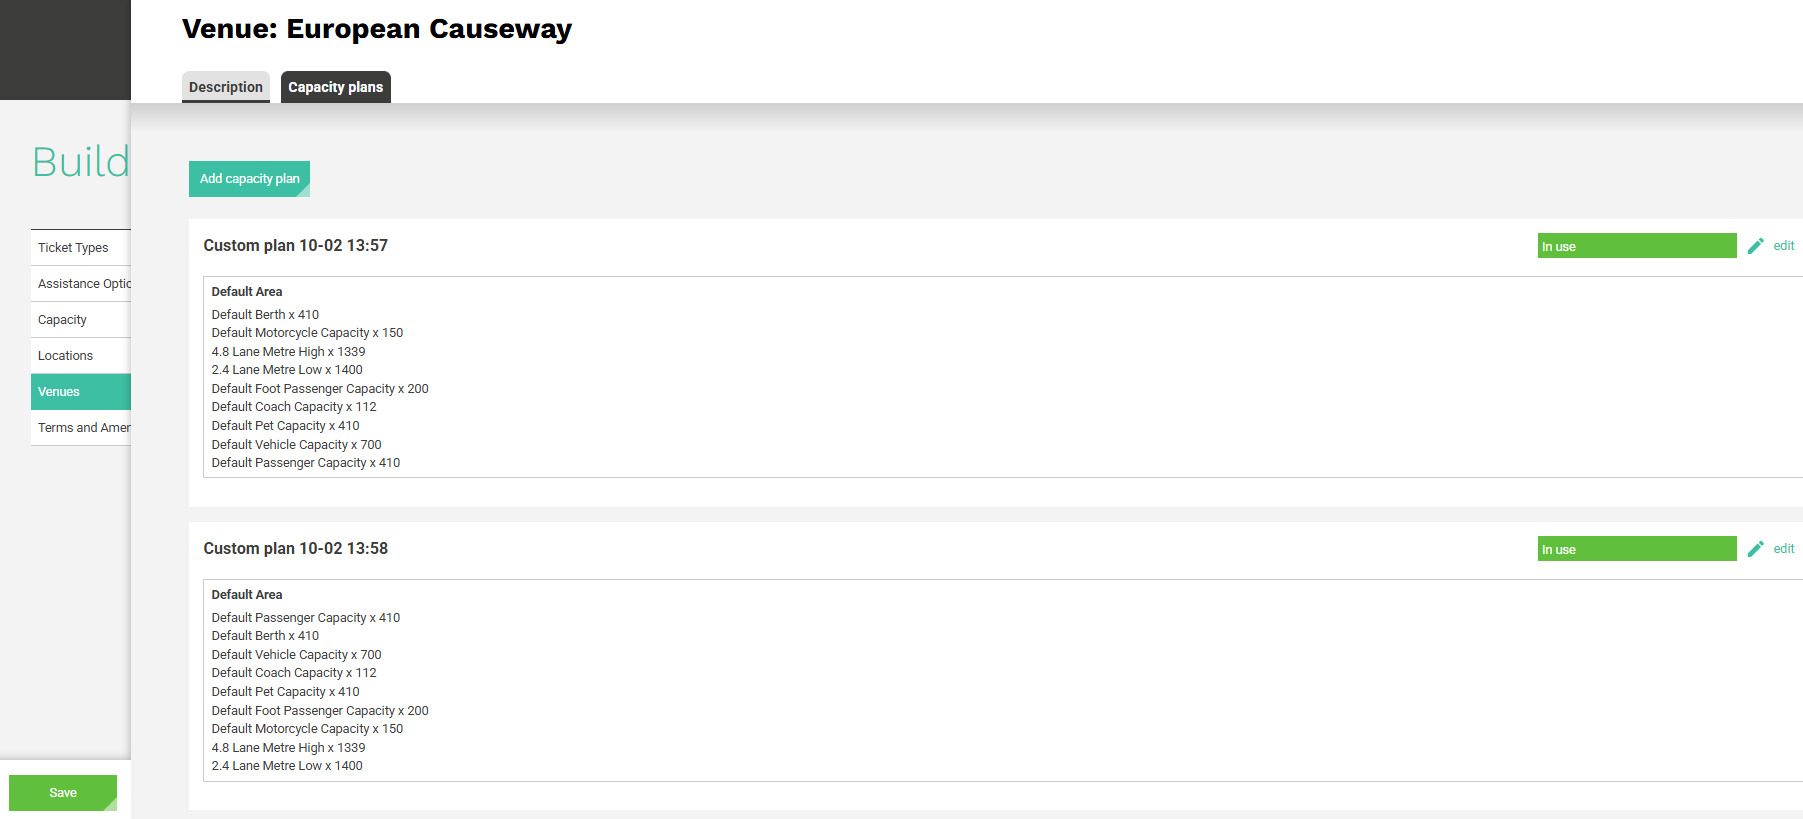
European Causeway summary page, multiple capacity plans are displayed to illustrate different loading scenarios for the same vessel. Each plan lists capacity types within a Default Area, enabling operators to compare, edit, or activate plans depending on operational requirements, such as vessel maintenance schedules, seasonal demand, or special services. The green ‘In use’ label identifies which plan is currently active, ensuring that each sailing operates with the correct capacity configuration.
Example Capacity Plans Summary (Attractions)
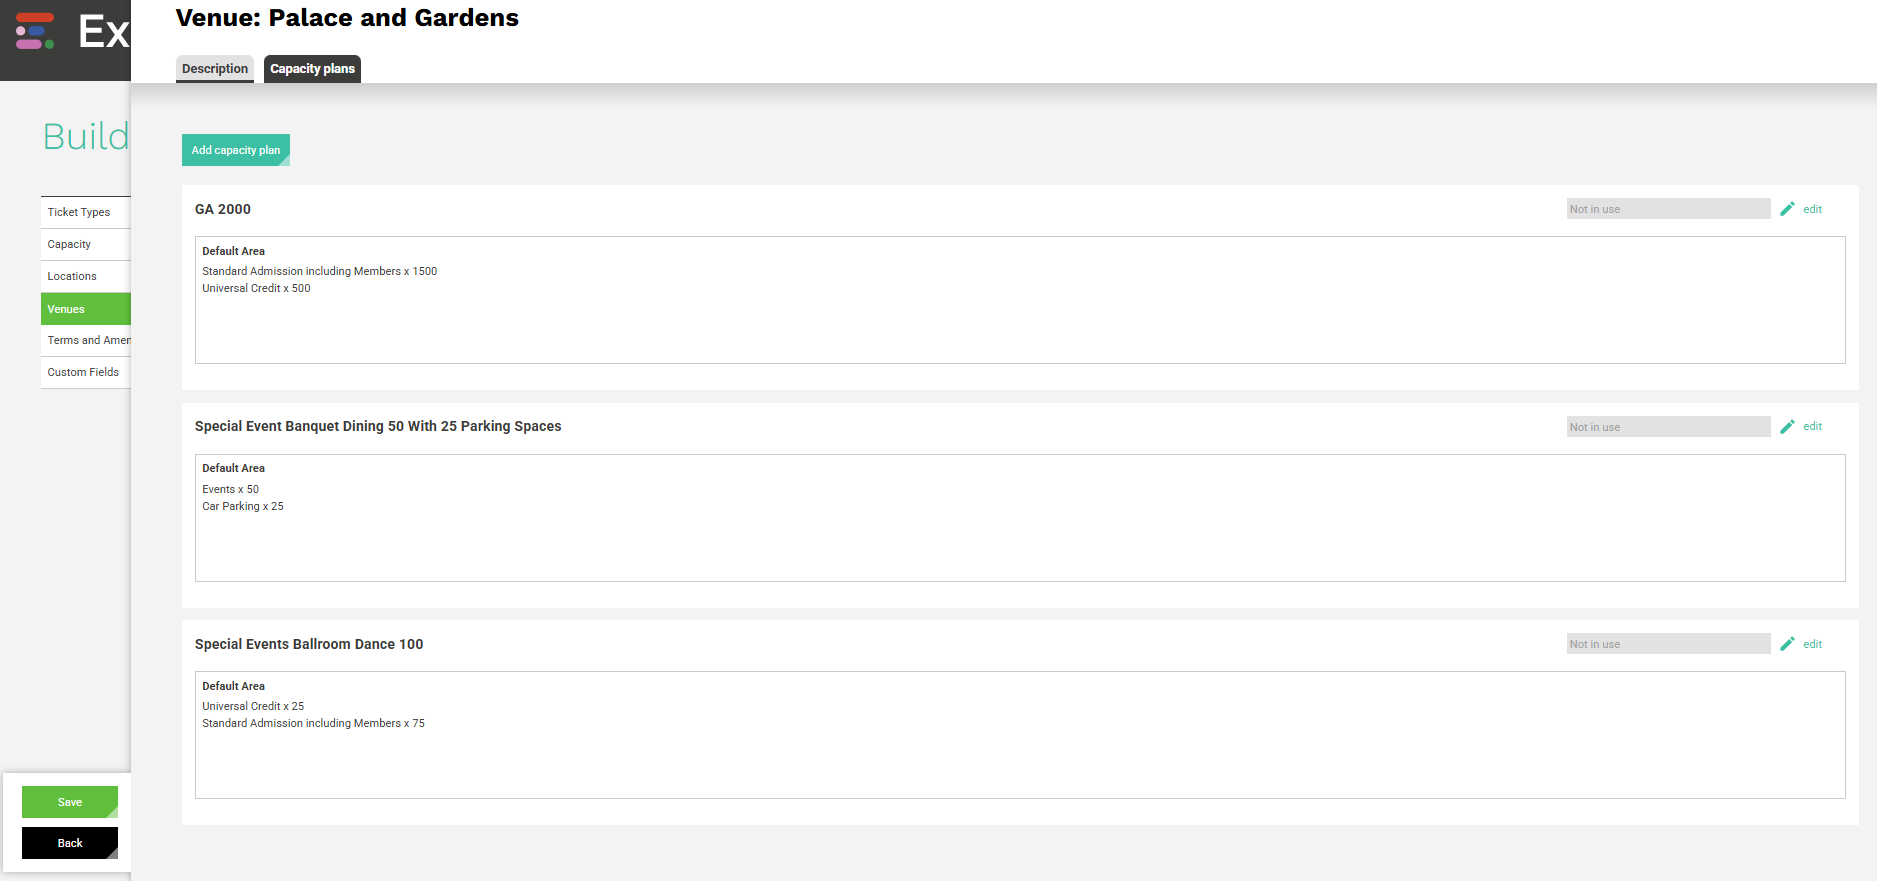
In this example, the venue Palace and Gardens include three separate capacity plans, each demonstrating different ways the same space can be configured and used. The GA 2000 plan represents general admission, with a total capacity of 2,000 split between Standard Admission including Members (1,500) and Universal Credit (500) visitors. The Special Event Banquet Dining 50 with 25 Parking Spaces plan shows an event-specific setup that includes multiple capacity elements, such as event attendees (50) and car parking spaces (25). The Special Events Ballroom Dance 100 plan illustrates a smaller, focused configuration designed for exclusive events. This flexibility enables operators to manage a variety of activities, audience types, and event formats within a single venue setup.
Best Practices
- Always define capacities first before linking products to venues as this prevents overbooking.
- Name plans descriptively (e.g., 'GA 2000' or 'Ferry 1 Sep–Oct') for easy recognition.
- Use upload/download functions for bulk edits or version control before going live.
- Test new plans in a sandbox environment to confirm correct allocations and restrictions.
- Deactivate outdated plans to avoid confusion or double-counting capacity.
Ticket Type Summary
Together, the Ticket Type tabs define the full lifecycle of a sellable item, from what it is and who it’s for, to how it’s measured, restricted, integrated, and tracked.
- The Description tab establishes the core identity and grouping of the ticket.
- Capacity determines how the ticket consumes physical or virtual space.
- Mandatory Companions enforces logical purchase rules between related ticket types.
- Integrations connect the ticket to external or operational systems.
- Settings control its availability across channels and entitlement types.
- Analytics enables performance tracking and data-driven insight.
By configuring these components consistently, organisations can create a seamless and scalable ticketing framework, one that supports both straightforward customer journeys and complex operational needs, across attractions, events, and travel services alike.
Custom Fields
Custom fields capture additional information from customers during booking. They can be grouped and reused across multiple products to maintain consistency in data collection.
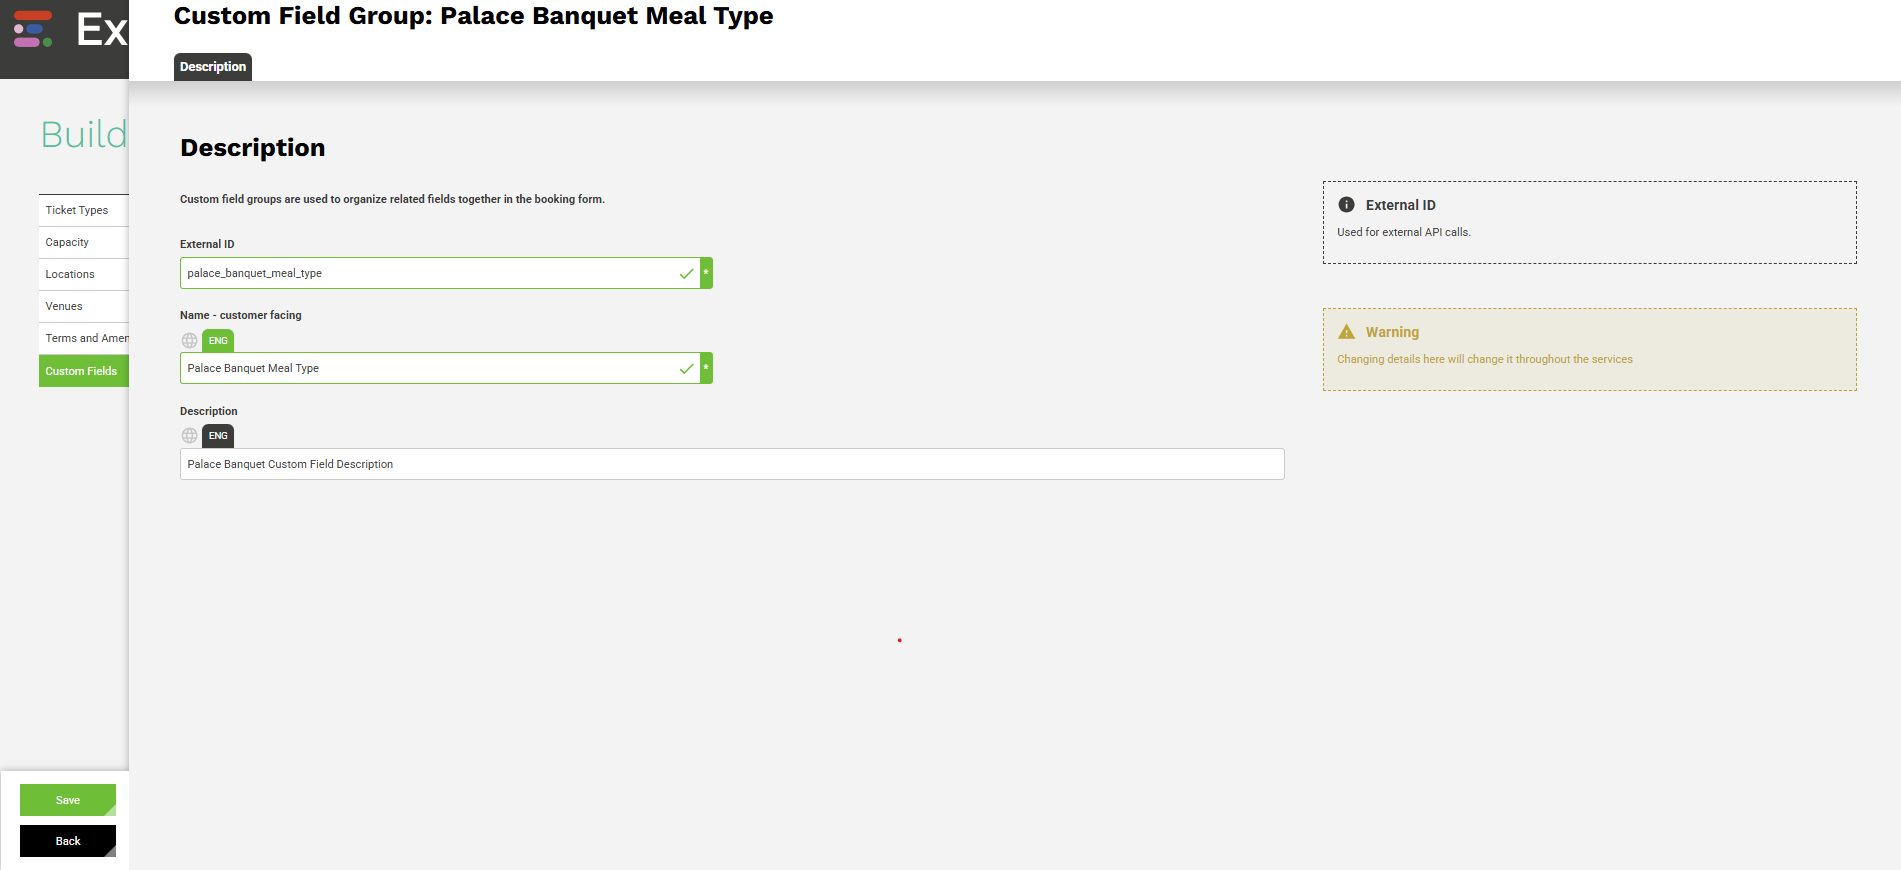
Create Custom Field Group
Click Add Custom Field Group IMAGE
- External ID: Required. Used as a unique system identifier for external integrations (for example, with finance).
- Name - Customer Facing: Enter the name that will be visible to customers.
- Description: Description of the custom field group.
Once all details are entered, click Save to apply your new custom field.
Click Add Custom Field IMAGE
Create Custom Field → Description Tab
- External ID: (Required). Used as a unique system identifier for external integrations (for example, with finance).
- Title: Title of the Custom Field
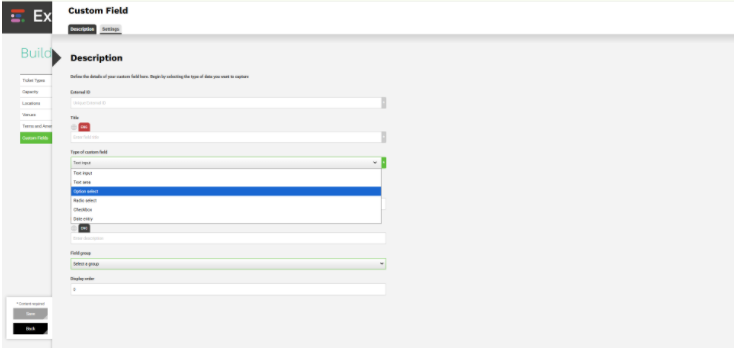
- Types of Custom Field: This defines the input format and how the data will appear during the booking process.
- Text Input: A single-line text box for short responses, such as names, membership numbers, or short notes.
- Text Area: A larger multi-line field for longer responses such as special requests, accessibility information, or dietary requirements.
- Option Select: Creates a dropdown list of predefined choices. Use when the customer should pick one value from a list (e.g. ’Adult’, ’Child’, ’Senior’).
- Radio Select: Displays a set of radio buttons for selecting one option from a list. Ideal for quick yes/no or single-choice questions.
- Checkbox: Allows one or more selections from multiple options. Useful for statements like ’I agree to terms’ or ’Subscribe to newsletter.’
- Date Entry: Adds a date picker for capturing specific dates, such as visit preferences, birthdays, or travel dates.
If you select Option Select, Radio Select, or Checkbox, you’ll need to define the available options.
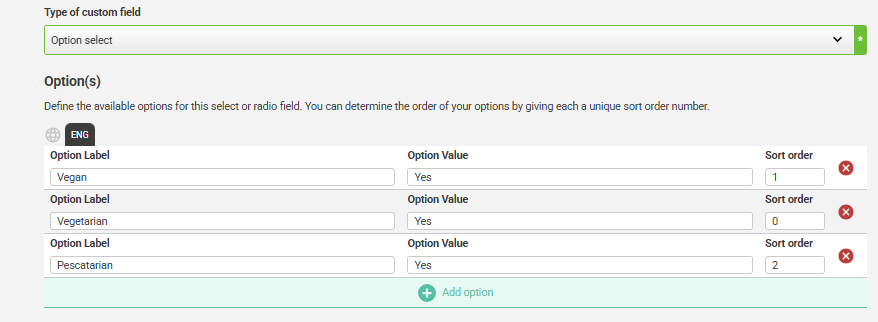
Each option contains three key elements:
- Option Label: The text shown to the customer (e.g., Vegetarian Meal).
- Option Value: The stored system value for reporting or integration.
- Sort Order: Determines the display order of the options (e.g., 1 = top of the list).
Click Add option to include more choices. You can create as many options as needed.
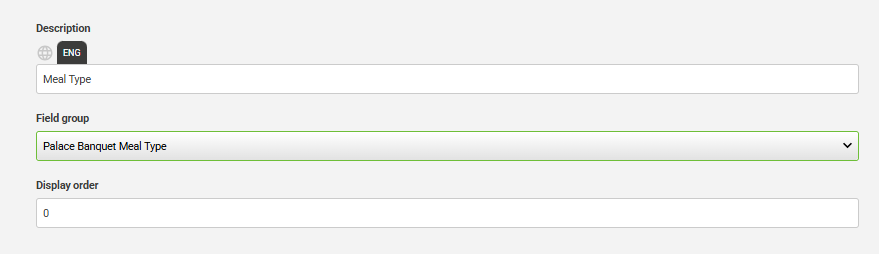
- Description: A short explanation of what the field is used for (internal reference).
- Field Group: Assign the field to an existing Custom Field Group, which helps keep related questions together on the booking form (for example, Customer Information or Event Preferences).
- Display Order: Controls the order in which the field appears within its group.
Create Custom Field → Settings Tab

The Settings tab defines validation and display behaviour for each custom field.
- Required Field: Enable this option if the field must be completed before a booking can be submitted.
- Error Message: Enter the message that will appear if a user attempts to proceed without filling out a required field (for example, 'Please select a meal type before continuing.').
These settings ensure that essential customer information is collected consistently during the booking process.
Once all details are entered, click Save to apply your new custom field.
The field will now appear under its assigned group in Building Blocks → Custom Fields and can be attached to relevant products in the Important Info tab when required.
Best Practices
- Keep labels customer-friendly and error messages clear.
- Use groups logically (e.g., Customer Info, Preferences, Accessibility).
- Avoid redundant or duplicate fields to maintain clean data.
- Regularly review active fields to ensure they remain relevant to current operations.
- Validate required fields to prevent incomplete bookings or data capture issues.
Summary
The Building Blocks area provides the essential foundation for every operational element within Expian.
It defines the structure, logic, and relationships between your products, venues, and capacities, ensuring that all sales, reports, and integrations function seamlessly.
By configuring these elements clearly and consistently, you create a scalable, reliable ecosystem that supports complex ticketing, multi-site operations, and data-driven decision-making across both Attractions and Travel sectors.
Feature Highlights Appendix
Capacity Types
Supports inclusion, compliance, and correct sales logic.
Capacity Options
Maintains unified reporting and seamless reconciliation.
Linked Route Management
Connects capacities, entitlements, and integrations.
Venues
Simplifies setup, reduces errors, and supports scaling.
Define capacities per venue, event, or sailing.
Comprehensive Configuration
Category
Locations
Transfers
Connect Expian data to finance and CRM systems.
Defines exactly what is sold and how it’s fulfilled.
Grouped Configurations
Integrations
Multi-Level Location Hierarchy
Feature
Define main and sub-locations to manage complex sites.
Define dynamic refund and change policies by date, value, or booking type.
Capacity Planning
Performance Tracking
Analytics
Enhances personalisation, reporting, and data completeness.
Enables detailed operational control and reporting.
Prevents overbooking and ensures accurate space control.
Define how space is tracked (lane metres, visitor count, berths).
Create seamless transfers between connected locations.
Provides insight into product and channel performance.
Cost Centres & Account Codes
Ensures accessibility or policy compliance (e.g., Carer with Access Ticket).
Collect additional information during booking.
Terms & Amendment Fees
Enables customers to specify mobility or service needs.
Ticket Types
Prevents booking conflicts and improves customer experience.
Description
Ensures transparent customer communication and compliance.
Apply tags for Google Tag Manager or analytics dashboards.
Cost Centre Integration
Custom Data Capture
Custom Fields
Assistance Options
Accessibility Support
Terms & Amendment Fees
Supports accurate financial tracking and audit alignment.
Linked Purchase Rules
Mandatory Companions
Improves inclusivity and operational preparedness.
Supports accurate availability management and safety compliance.
Organise related capacities under structured groups.
Why It Matters
Flexible Fee Rules
Physical and Logical Measurement
Link to accounting codes for reporting and reconciliation.
Was this article helpful?
That’s Great!
Thank you for your feedback
Sorry! We couldn't be helpful
Thank you for your feedback
Feedback sent
We appreciate your effort and will try to fix the article