Overview
Services define when and how a product is made available for sale.
They combine your Ticket Types, Venues, and Capacity Plans into scheduled, bookable time slots, whether that’s an hourly event, daily admission, or a ferry crossing.
While Building Blocks define what you sell, Services define when and how you sell it.
- From the top navigation bar, select Services.
There are two main Service types:
- Admissions / Events – for attractions, exhibitions, or shows.
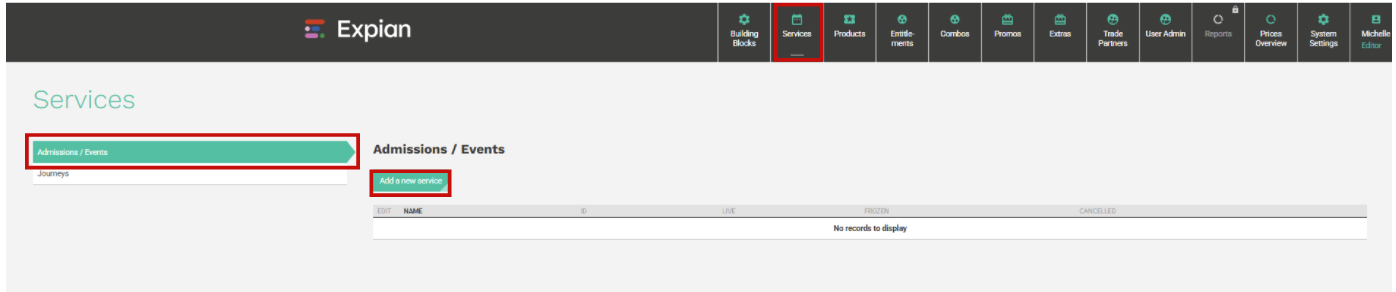
- Journeys – for transport or travel services such as ferries or bus routes.
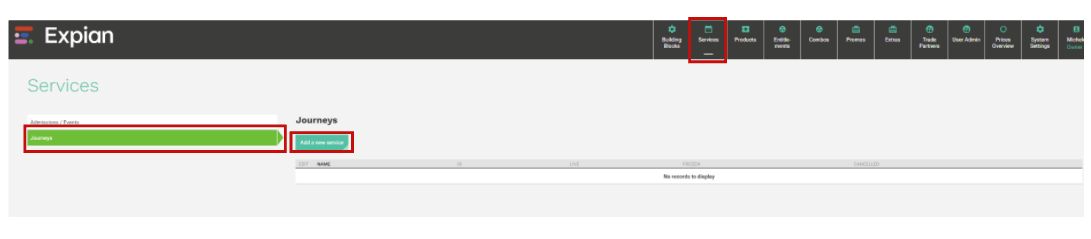
Choose either:
- Admissions / Events: for attractions and tours.
- Journeys: for ferries, coaches, or other transport services.
- Click Add a new service.
? Tip: If you’re unsure which type applies, think:
- Fixed location, visitors attend → Admissions/Event
- Point-to-point travel → Journey
Create Journeys and Events
Services are organised into three core tabs:
- Description: Basic details about the service.
- Time Slot Templates: Define where the event occurs or what route it follows, along with duration and capacity.
- Timetables: Generate, publish, and manage live, frozen, or cancelled booking instances.
Description Tab
The Description tab captures the essential details of your service. IMAGE
Enter your service details:
- External ID: Unique identifier used for API integrations. (e.g., GA_SUMMER_2025 or CAL_DOV_01)
- Service Name: The name displayed throughout the system (e.g., General Admission – Summer 2025 or Calais to Dover Crossing).Venue: The location associated with this service. (Where the event or journey operates.)
- Service Type: Determines whether this is an Admission/Event or Journey.
- Active / Inactive: Toggle to control whether the service is live in the system. (Set to Active when ready to use.)
Create Time Slot Templates
Click on Time Slot Template Tab. IMAGE of Tab
Time Slot Templates define how your services are structured, either as events or travel routes.
Create a Time Slot Template
Templates define how your service operates, its location, route, duration, and capacity. IMAGE of Setup Tab
Click on Add Template
Setup Tab
The Setup Tab defines the internal structure and key attributes of your Time Slot Template.
This is where you create the foundation of the service, giving it an internal name, connecting it to a venue and capacity plan, and setting how time slots appear to customers.
The available fields are almost identical across both Attractions/Events and Travel/Ferries, with minor naming differences depending on the service type.
How to Complete the Template → Setup Tab
- Template Name: Enter a clear, internal name for the template
Example (Attractions): HCG G GA Time 150
Example (Ferries): France: CQF → DVR
Use consistent naming conventions to make templates easy to locate, especially when managing multiple venues or routes.
- Template Description: Provide a brief description of the template’s purpose or configuration. This appears internally and helps teams distinguish between similar templates.
Example (Attractions): General Admission 150 capacity – Gardens Only
Example (Ferries): Cross-Channel Journey – Spirit of France Default Plan
- Event Venue / Journey Venue: Select the venue associated with the template.
Example (Attractions): → Event Venue (e.g., Hillsborough Castle and Gardens: Gardens Only)
Example (Ferries): → Journey Venue (e.g., Spirit of France)
The selected venue determines where the service takes place and which Capacity Plan options are available.
- Capacity Plan: Choose the capacity plan that will govern ticket availability for this service. Each plan defines the total number of bookings allowed and how capacity is tracked.
Example (Attractions): HCG G GA Time 150
Example (Ferries): Spirit of France Default Plan
Tip: Choose a plan that aligns with your operational limits: for example, seat count, vehicle spaces, or visitor capacity.
- Maximum Number of Bookings Allowed: Optionally, set a limit to cap the total number of bookings for this template.
Leave blank to default to the capacity defined in the selected Capacity Plan.
- Time Slot Display: Define how the time slot will appear to the customer in the booking journey.
- Time (e.g., 09:00): displays the specific start time.
- Time Range (e.g., 09:00 – 09:30): shows a fixed duration window.
- Title: displays a textual label such as Morning, Afternoon, or Evening.
Example (Attractions): Attractions Example: Visitors might see 10:00 – 10:30 Entry or Morning Admission.
Example (Ferries): Passengers see Depart 09:00 or Crossing 10:45 – 12:20.
- API All-Day Ticket: Check this box if the service represents an all-day product sold through an integrated API.
This setting ensures integrations (such as third-party resellers or ferry gateways) correctly identify and categorise the ticket type.
- Leave unchecked for timed events and journeys.
- Use for general admission passes valid all day. IMAGE for both Event and Ferry
Best Practice
- Use consistent naming across all templates (e.g., Venue + Service Type + Capacity).
- Double-check that the selected Venue matches the intended Capacity Plan before saving.
- Avoid leaving 'Maximum Bookings'
- empty unless the capacity plan is tightly controlled elsewhere.
- Clearly define Time Slot Display to align with your customers’ experience, e.g., time range for tours, fixed time for crossings.
- Only enable API All-Day if required for integration-driven ticket sales.
Template → Setup Tab
The Setup Tab defines the internal structure and key attributes of your Time Slot Template.
This is where you create the foundation of the service, giving it an internal name, connecting it to a venue and capacity plan, and setting how time slots appear to customers.
The available fields are almost identical across both Attractions/Events and Travel/Ferries, with minor naming differences depending on the service type.
How to Complete the Template → Event Details / Routes Tab
The Event Details or Route tab defines where your service takes place and how long it lasts.
This is where the experience or journey is mapped, either by location (for attractions and events) or by travel route (for ferries and other transport services).
The available tab depends on the selected Service Type:
- Event Details Tab → Admissions / Events
- Route Tab → Journeys (Ferries / Travel)
For Attractions and Events – Event Details Tab
The Event Details tab specifies the location and duration of your timed event or session.
- Event Location: Select the venue or specific sub-location where the event will take place.
Example (Attractions): Hampton Court Palace – Main Hall or Hillsborough Castle and Gardens – Gardens Only.
This ensures bookings are correctly linked to the physical space and its capacity plan.
- Event Duration: Enter the length of time for each event session.
Example (Attractions): Example: 2 hours for a guided tour
Example (Attractions): 8 hours for an all day experience.
The duration determines how time slots are created and displayed in the timetable. IMAGE EVENTS TAB
Click Save: Once saved, this template can be used to build one or more Timetables for recurring events or sessions.
For Ferries and Travel Routetab
The Route tab defines the journey path, including start and end points, travel time, and any intermediate stops.
This ensures that each leg of the journey is structured and correctly reflected in capacity tracking and timetable generation.
Define Stops and Order: Add the sequence of stops for your journey.
Click on Add new record bar IMAGE
- Set Travel and Duration Times:
Travel: Enter the travel time between each stop which is calculated by the Start, End and any Stops you put in.
Duration: Enter the total time spent on that leg (including boarding or waiting times).
Example: Calais → Dover – 1h 35m.
- End: Select the destination (e.g., Dover).
- Start: Select the departure point (e.g., Calais).
Stops are listed in travel order and can include intermediate points for multi-leg routes.
- Remove Stops: Use the delete (✖) icon to remove a stop if not required.
This flexibility allows operators to model direct, circular, or multi-leg routes.
Once the route is defined, click Save to finalise the template. The route structure will then feed directly into timetable creation.
Best Practice
- Use descriptive names for event locations and routes to make them easy to identify.
- Keep travel and duration times realistic to prevent scheduling conflicts.
- Test your template by creating a draft timetable to ensure correct slot spacing and capacity behaviour.
- Update durations or routes seasonally to reflect changes in operational schedules.
Both versions allow you to create multiple templates, each representing a unique service configuration.
Template → History Tab
The History Tab provides an audit trail of all edits and publications made to the template, including the user, timestamp, and action type, allowing quick review or rollback of recent changes.
Once saved, templates become available for timetable generation.
Create a Template →Timetable
The Timetables tab is where services become live and bookable, or operational, turning templates into scheduled, bookable time slots. The landing page displays a message if no time slots currently exist for the selected date range.


From here, you can generate new time slots, update existing ones, and manage visibility or availability for sale.

You will taken to the Step 1: Select Template To Use Tab
Add Time Slots
- Select the Add Time Slots button to begin creating a new timetable for this service.
- Select from a list of templates that are available from the Event Details / Route Tab
- Your template details will appear and the Next: Define Start Time button will go green
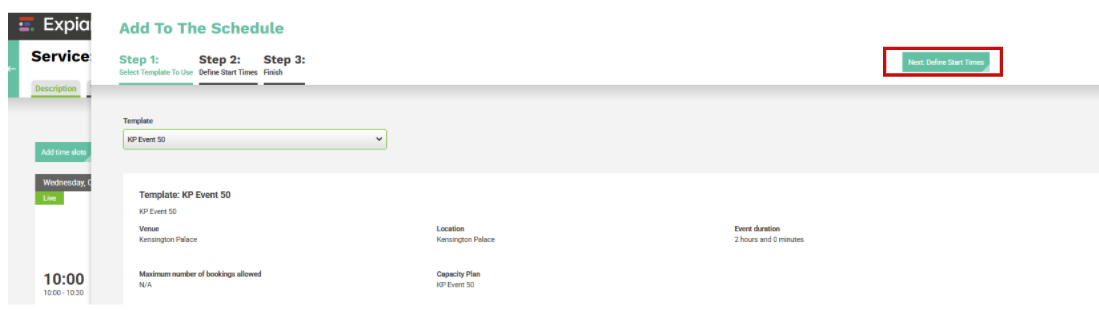
- Click on Next: Define Start Times button and you will be taken to Step 2: Define Start Time tab
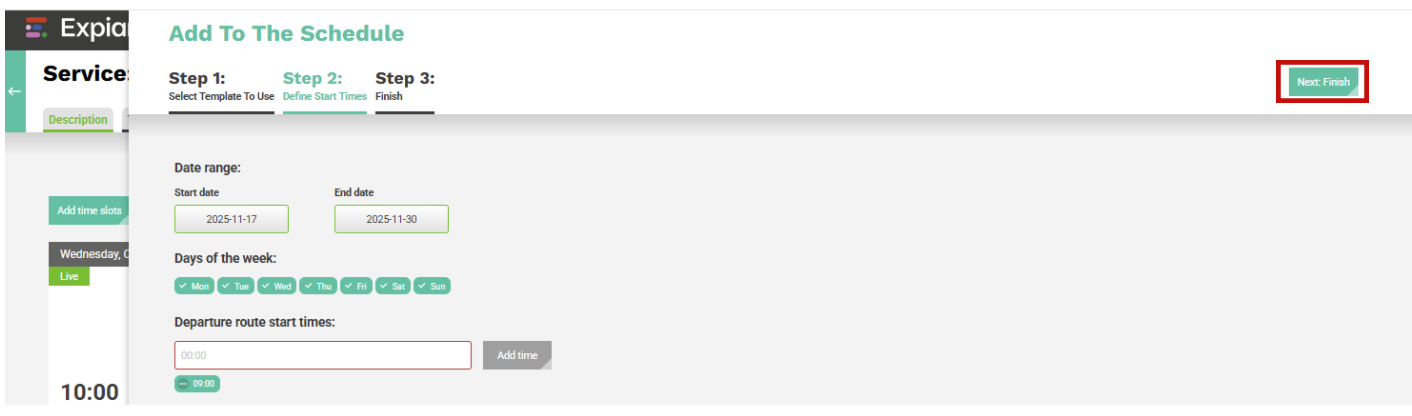
- Date Range: Select your Start and End Dates for your schedule service
- Days of the week: Select the that the schedule is running on.
- Departure route start times: Select your start times for each Attractions/Eventsor Ferries/Traveland click the Add Time button. you may add as many Start Times as is logically possible.
Once you have added a single Departure route start times and completed all the other details, the Next: Finish button will go green
- Click on the Next: Finish button
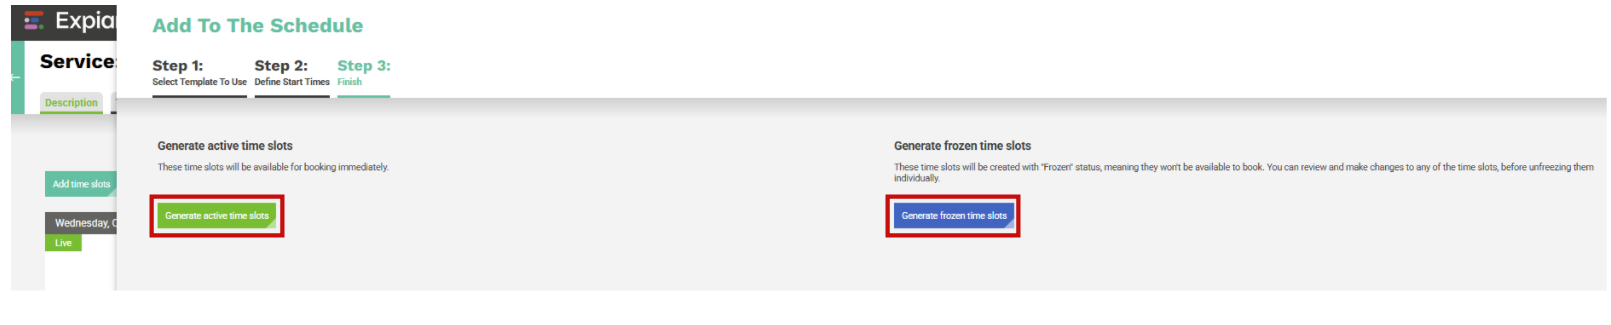
- Choose how to publish your newly created time slots:
- Generate Active Time Slots: Immediately make the slots live and available for booking and you will be returned to the Timetable tab
- Generate Frozen Time Slots : Create the slots in a 'Frozen' state, allowing you to review or adjust details before making them available.
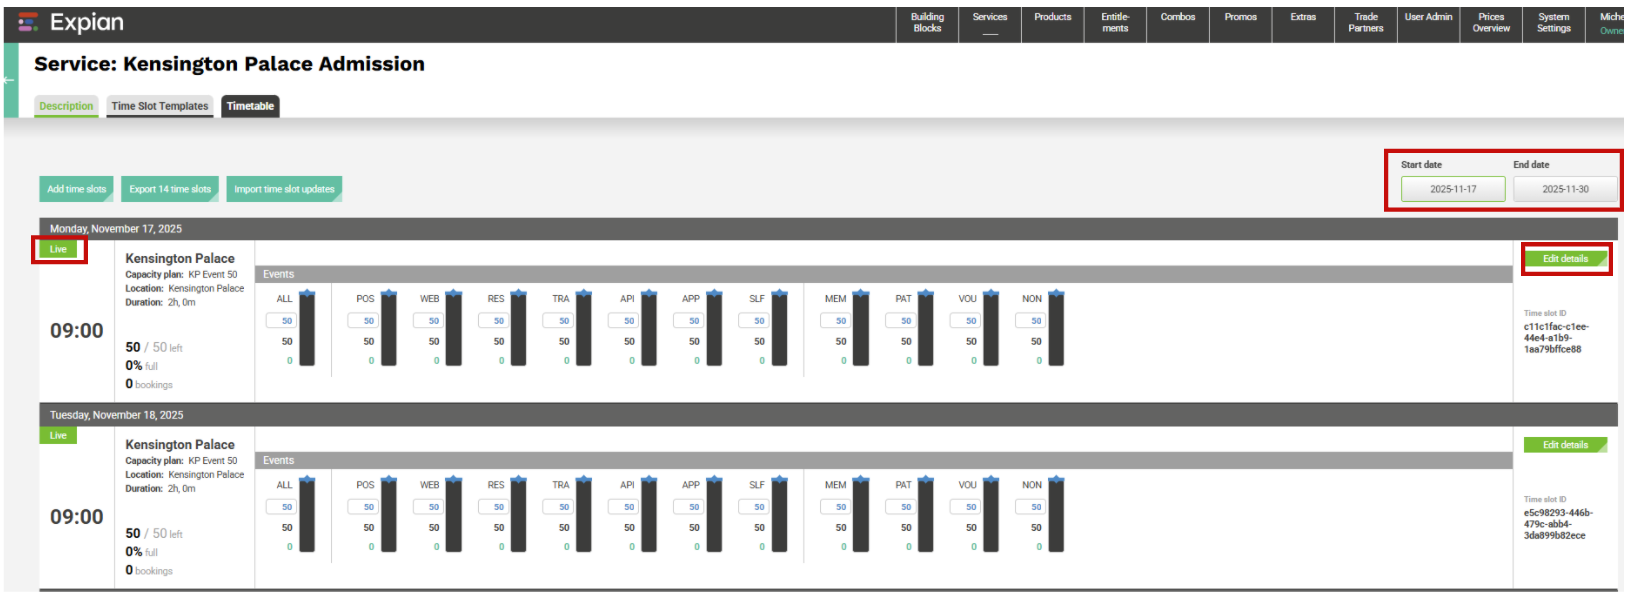
In the above example, we have selected the top top created within the date range input, using the Start and End Dates mentioned earlier. Both are set to Live
Using the Edit Details button on the right of the first timeslot, the user is taken to the Time slot page where you can edit.
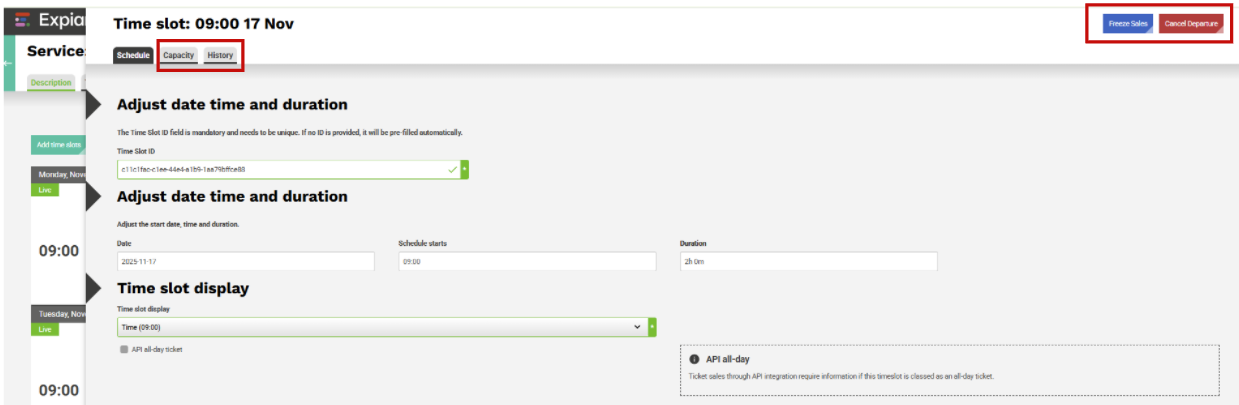
Edit and Freezing a Time Slot
From the Time Slot Edit screen, you can adjust key scheduling details or temporarily remove a slot from sale.
- Edit Slot Details
- Update the Date, Start Time, or Duration to change when the service runs.
- Adjust the Time Slot Display (e.g., 'Time (09:00)') for how it appears in booking systems.
- Enable the API all-day ticket checkbox if the slot applies to full-day tickets or integrations.
- Freeze or Unfreeze Sales
- Use the Freeze Sales button (top right) as a toggle:
- Freeze: temporarily makes the slot unavailable for booking.
- Unfreeze: re-opens the slot for sale.
- Cancel or Reinstate Departures
- Select Cancel Departure to mark a time slot as cancelled and remove it from sale.
- Once cancelled, the same button toggles to Reinstate Departure to make it active again.
These options provide quick control for managing availability, schedule adjustments, or operational changes without deleting the time slot.
Manage Timetables
Click on the Capacity tab
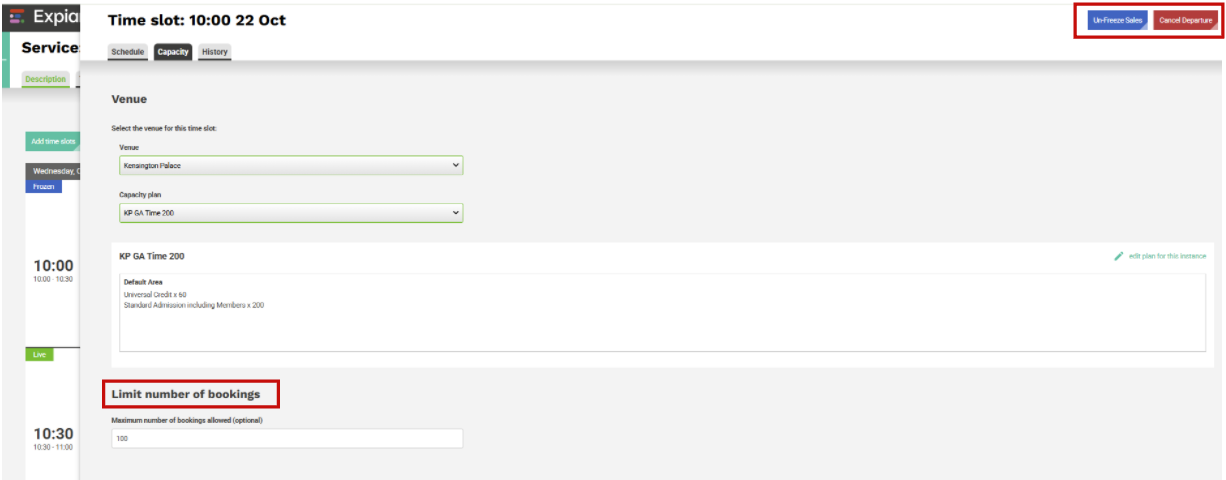
Edit Time Slot Capacity
From the Capacity tab, you can adjust the venue and capacity settings for a specific time slot.
- Venue: Select or confirm the venue where this time slot applies (e.g., Kensington Palace).
- Capacity Plan: Choose the appropriate capacity plan linked to the venue (e.g., KP GA Time 200).
- Edit Plan for This Instance: Use this option to modify the capacity plan for this specific time slot only—useful for special events or exceptions.
- Limit Number of Bookings: Optionally, set a maximum number of bookings allowed for this specific time slot to control sales volume.
These tools let you manage attendance limits and adjust capacity dynamically without altering the master plan.
Note that there is also an Integration for 3rd party client software and History tab to see who and when changes were made.
Time Slot → Route tab used for Travel
Below there is a variance for Travel / Ferries

Define Stops and Travel Time
Set Travel and Duration Times:
Travel: Enter the travel time between each stop which is calculated by the Start, End and any Stops you put in.
Duration: Enter the total time spent on that leg (including boarding or waiting times).
Example: Calais → Dover – 1h 35m.
- End: Select the destination (e.g., Dover).
- Start: Select the departure point (e.g., Calais).
Stops are listed in travel order and can include intermediate points for multi-leg routes.
- Remove Stops: Use the delete (✖) icon to remove a stop if not required.
This flexibility allows operators to model direct, circular, or multi-leg routes.
Once the route is defined, click Save. The route structure override the Template structure.
ManageTime Slots
- Freeze: Temporarily remove a slot from sale.
- Unfreeze: Make a previously frozen slot bookable again.
- Cancel: Permanently remove a slot (e.g., weather closure).
- Reinstate: Return a cancelled slot to active status.
- Add, export, or import time slots using a spreadsheet, ideal for managing and verifying bulk updates more efficiently. Bulk actions allow freezing, cancelling, or reinstating multiple instances at once as well as capacity changes.
- Capacity Breakdown: Displayed on the Service → Timetable tab, a summary of how the capacity is distributed (e.g., Universal Credit x 60, Standard Admission including Members x 200).
- Increase or decrease limits based on operational requirements.
- Each timetable instance includes flexible sales controls.
These controls allow fine-grained management of ticket allocation across multiple sales channels.
Best Practice
- Build templates first, then create timetables.
- Keep naming consistent between services, templates, and capacity plans.
- Use Frozen status to prepare seasonal or future events.
- Regularly review sales data to manage demand and avoid overselling.
- For travel routes, ensure duration and stop order match real-world schedules.
- For attractions, verify that venue and capacity plans align with operational availability.
Status Indicators
Summary
Services bring your ticketing configuration to life.
They define when products can be booked, how capacity is allocated, and where the experience takes place.
Attractions use event-based templates to manage timed admissions or tours.
Ferries and transport operators use route-based templates to schedule crossings or journeys.
Together, they create a unified, flexible framework for scheduling, managing, and monitoring every bookable experience within your organisation.
? Live
Status
? Frozen
Meaning
Permanently removed, can be reinstated manually
? Cancelled
Available for booking
Temporarily paused, not on sale
Was this article helpful?
That’s Great!
Thank you for your feedback
Sorry! We couldn't be helpful
Thank you for your feedback
Feedback sent
We appreciate your effort and will try to fix the article